
Quick Start Guide
Overview of the Application Example
Introduction
The Quick Start Guide uses an application example to illustrate each step in the process of installing, configuring and using TeSys T.
The application example uses the LTM R controller to protect and control a motor and its driven load, in this case, a pump.
This application example is intended to:
-
show you how to configure the LTM R controller in a few steps,
-
provide an example you can modify to develop your own configuration,
-
serve as a starting point for the development of more complex configurations, incorporating such additional features as HMI or network control.
Functions Performed
When the LTM R controller has been configured in order to protect and control the motor and pump, it will perform the following functions:
-
thermal overload protection
-
motor temperature sensor protection
-
voltage protection / undervoltage
-
external ground current trip protection
-
initial system configuration during commissioning using PC and PowerSuite software
Operating Conditions
The operating conditions used in the application example are:
-
motor power: 4 kW
-
line-to-line voltage: 400 Vac
-
current: 9 A
-
control circuit voltage: 230 Vac
-
3-wire control
-
motor trip class 10
-
start button
-
stop button
-
reset button on enclosure door
-
trip light
-
alarm light
-
full voltage, non-reversing starter (direct over the line starter)
-
24 Vdc power supply in the motor control center or control station for future use with LTM E expansion module inputs
Network Conditions
The network conditions for the example are:
-
protocol: Modbus/TCP
-
address: 1
Components Used
The application example uses the following components:
|
Item |
Component Description |
Reference Number |
|---|---|---|
|
1 |
LTM R 100-240 Vac Modbus/TCP motor management controller (1.35...27 A FLC) |
LTMR27EFM |
|
2 |
LTM E 24 Vdc expansion module |
LTMEV40BD |
|
3 |
LTM R to LTM E RJ45 connection cable |
LTMCC004 |
|
4 |
PowerSuite cable kit |
VW3A8106 |
|
5 |
PowerSuite software on CD-ROM, version ≥ 2.5 |
PowerSuite |
|
6 |
External ground current sensor |
TA30 |
|
7 |
External PTC binary motor temperature sensor |
User supplied |
Presentation of the TeSys T Motor Management System
System Overview
The TeSys T Motor Management System offers protection, control, and monitoring capabilities for single-phase and 3-phase AC induction motors.
The system offers diagnostic and statistics functions and configurable alarms and trips, allowing better prediction of component maintenance, and provides data to continuously improve the entire system.
The 2 main hardware components of the system are:
-
the LTM R controller, and
-
the LTM E expansion module.
System Presentation
The following tables describe the main components of the TeSys T Motor Management System.
|
LTM R Controller |
Functional Description |
Reference Number |
|---|---|---|
|
|
|
LTMR08EBD (24 Vdc, 0.4...8 A FLC) |
|
LTMR27EBD (24 Vdc, 1.35...27 A FLC) |
||
|
LTMR100EBD (24 Vdc, 5...100 A FLC) |
||
|
LTMR08EFM (100...240 Vac, 0.4...8 A FLC) |
||
|
LTMR27EFM (100...240 Vac, 1.35...27 A FLC) |
||
|
LTMR100EFM (100...240 Vac, 5...100 A FLC) |

|
LTM E Expansion Module |
Functional Description |
Reference Number |
|---|---|---|
|
|
Additional components required for an optional expansion module:
|
LTMEV40BD (24 Vdc logic inputs) |
|
LTMEV40FM (100...240 Vac logic inputs) |

|
PowerSuite Software |
Functional Description |
Reference Number |
|---|---|---|
|
|
Additional components required for PowerSuite software:
|
PowerSuite ≥ v 2.5 |
|
VW3A8106 (PowerSuite cable kit) |

|
LTM CU Control Operator Unit |
Functional Description |
Reference Number |
|---|---|---|
|
|
Additional components required for an optional HMI device:
|
LTM CU |
|
VW3A1104R.0 (HMI communication cable) |
||
|
VW3A8106 (PowerSuite cable kit) |
||
|
LTM9KCU Kit for portable LTM CU |

LTM R and LTM E Description
The following diagrams show the features of the LTM R controller and LTM E expansion module:


Installation
Overview
The following procedure describes how to install and physically configure the TeSys T system, according to the operating conditions used in the application example. The same procedure is used for other configurations.
The full installation procedure is shown on the Instruction sheets provided with the LTM R controller and the LTM E expansion module. It is also described in detail in the Installation chapter of the User Manual.
 DANGER DANGER |
|---|
|
HAZARD OF ELECTRIC SHOCK, EXPLOSION OR ARC FLASH
Turn off all power supplying this equipment before working
on it.
Apply appropriate personal protective equipment
(PPE) and follow safe electrical work practises.
Failure to follow these instructions will result in death or serious injury.
|
The following diagrams show the physical dimensions of the LTM R controller and the LTM E expansion module:
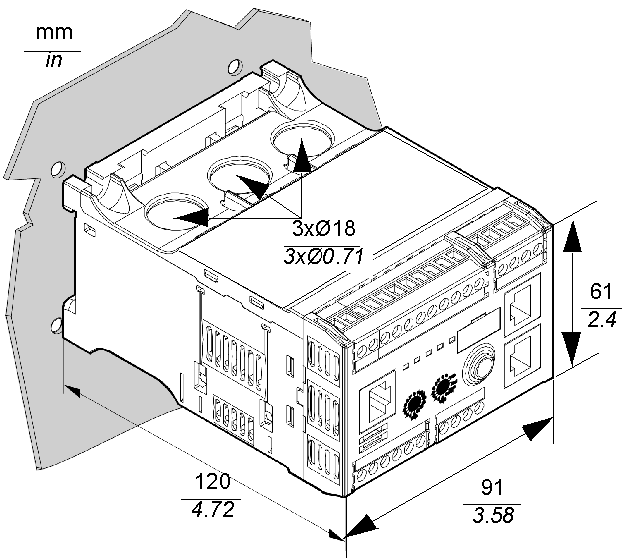

Mount LTM R and LTM E
Mount the LTM R controller and the LTM E expansion module, respecting clearance zones and operating position.


Connect LTM R to LTM E
Connect the LTM R controller and the LTM E expansion module using the RJ45 cable.
Connecting to a TeSys T LTM CU HMI Device (Optional)

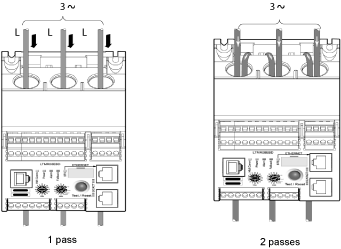
Wire Current Transformers
Wire the current transformers according to the operating conditions:
-
Product range → 1.35...27 A
-
Nominal motor current → 9 A
Wire Ground Current Sensor

Wire LTM R
-
Wire the power supply and the I/O.
-
Wire the temperature sensors.
| NOTICE |
|---|
|
RISK OF DESTROYING THE INPUTS
Connect the LTM R controller's
inputs using the 3 Common (C) terminals connected
to the A1 control voltage via an internal
filter.
Failure to follow these instructions can result in equipment damage.
|
Wire LTM E
Wire the voltage transformers and the I/O on the LTM E expansion module.
LTM R Controller Wiring
The diagram below illustrates the main power circuit and the 3-wire (impulse) local control with network control selectable, corresponding to the application example.

1 Contactor
2 Ground current sensor
3 PTC binary thermistor
4 Alarm indication
5 Trip indication
L Local control
O Off
N Network control
Configuration
Overview
After the wiring connections are made, the next step is to configure parameters using PowerSuite software (see the PowerSuite chapter of the User Manual).
 WARNING WARNING |
|---|
|
UNINTENDED EQUIPMENT OPERATION
The application of this product requires expertise in
the design and programming of control systems. Only persons with such
expertise should be allowed to program and apply this product.
Follow all local and national safety codes and
standards.
Failure to follow these instructions can result in death, serious injury, or equipment
damage.
|
Install Software
|
Step |
Description |
|---|---|
|
1 |
Place the installation disk into your PC’s CD/DVD drive. |
|
2 |
Navigate to and click on the setup.exe file. The setup wizard begins. |
|
3 |
Follow the instructions in the setup wizard. |
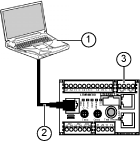
Connect to PowerSuite ™ Software

Set Parameters
|
Step |
Description |
|---|---|
|
1 |
Start up the PowerSuite software. |
|
2 |
In the Load Configuration screen, select and open a configuration file with factory default settings. |
|
3 |
Open the Device Information branch of the tree control and set the Operating parameter settings. |
|
4 |
Open the Settings branch of the tree control. |
|
5 |
Locate and set the Operating parameter settings in the Motor and Control sub-branch. |
|
6 |
Repeat step 5 for all other setting item sub-branches. |
|
7 |
Save a copy of the completed configuration settings to a new configuration file. |
Parameter settings for the application example:
|
Device Information Branch |
Sub-branch |
Parameter |
Setting |
|---|---|---|---|
|
Device information |
– |
Current range |
1.35-27 A |
|
Network |
Modbus/TCP |
||
|
Control voltage |
100-240 Vac |
|
Settings Branch |
Sub-branch |
Parameter |
Setting |
|---|---|---|---|
|
Motor and Control Settings |
Motor operating mode |
Nominal voltage |
400 V |
|
Nominal power |
4 kW |
||
|
Operating mode |
3 wire independent |
||
|
Contactor rating |
9 A |
||
|
Phase |
3 phase |
||
|
Motor temperature sensor |
Sensor type |
PTC binary |
|
|
Trip enable |
Enable |
||
|
Trip level |
According to motor |
||
|
Alarm level |
According to motor |
||
|
Load CT |
Load CT ratio |
Internal |
|
|
Load CT passes |
1 (1) |
||
|
Ground current sensor |
Ground current sensor ratio |
1000:1 |
|
|
Control mode |
Local control |
Terminal trip |
|
|
Thermal Settings |
Thermal overload |
Trip type |
Inverse thermal |
|
Trip class |
10 |
||
|
FLC1 (1) |
50 % * (equivalent to 9 A) |
||
|
Trip enable |
Enable |
||
|
Alarm enable |
Enable |
||
|
Current Settings |
Ground Current Mode |
Trip enable |
Enable |
|
Trip level |
1 A |
||
|
Trip timeout |
0.5 s |
||
|
Alarm enable |
Enable |
||
|
Alarm level |
200 mA |
||
|
Voltage Settings |
Undervoltage |
Trip enable |
Enable |
|
Trip level |
85 % |
||
|
Trip timeout |
3 s |
||
|
Alarm enable |
Enable |
||
|
Alarm level |
90 % |
Transfer the Configuration File
|
Step |
Description |
|---|---|
|
1 |
Open the configuration file to be transferred.
|
|
2 |
Connect your PC to the LTM R controller.
|
|
3 |
Transfer the configuration file:
Result: The product is now ready to use. |
FLC (Full Load Current) Settings
FLC Basics
Load CT ratio = Load CT primary / (Load CT secondary * Passes)
Current sensor max = Current range max * Load CT ratio
Current range max is determined by the LTM R controller commercial reference. It is stored in units of 0.1 A and has one of the following values: 8.0, 27.0, or 100.0 A.
Contactor rating is stored in units of 0.1 A and is set by the user between 1.0 and 1000.0 A.
FLCmax is defined as the lower of the Current sensor max and the Contactor rating values.
FLCmin = Current sensor max / 20 (rounded to the nearest 0.01 A.). FLCmin is stored internally in units of 0.01 A.
Conversion of Amperes to FLC Settings
FLC values are stored as a percentage of FLCmax
FLC (in %) = FLC (in A) / FLCmax
Example (No External CTs)
Data:
-
FLC (in A) = 9 A
-
Current range max = 27.0 A
-
Load CT primary = 1
-
Load CT secondary = 1
-
Passes = 1or 2
-
Contactor rating = 18.0 A
Calculated parameters with 1 pass:
-
Load CT ratio = Load CT primary / (Load CT secondary * passes) = 1 / (1 * 1) = 1.0
-
Current sensor max = Current range max * Load CT ratio = 27.0 * 1.0 = 27.0 A
-
FLCmax = min (Current sensor max, Contactor rating) = min (27.0, 18.0) = 18.0 A
-
FLCmin = Current sensor max / 20 = 27.0 / 20 = 1.35 A
-
FLC (in %) = FLC (in A) / FLCmax = 9.0 / 18.0 = 50 %
Calculated parameters with 2 passes:
-
Load CT ratio = 1 / (1 * 2) = 0.5
-
Current sensor max = 27.0 * 0.5 = 13.5 A
-
FLCmax = min (13.5, 18.0) = 13.5 A
-
FLCmin = Current sensor max / 20 = 13.5 / 20 = 0.67 A
-
FLC (in %) = FLC (in A) / FLCmax = 9.0 / 13.5 = 66 %
Diagnostic
LTM R and LTM E LEDs

LEDs
Use the 7 LEDs on the face of the LTM R controller to monitor its state, as follows:
|
LTM R LED |
Color |
Describes |
Indicates |
|---|---|---|---|
|
HMI Comm |
Yellow |
Communication activity between LTM R controller and LTM E expansion module |
|
|
Power |
Green |
LTM R controller power or internal trip condition |
|
|
Alarm |
Red |
Protection trip or alarm, or internal trip condition |
|
|
Fallback |
Red |
Communication connection between LTM R controller and network module |
|
|
STS |
Green |
These LEDs together indicate network communication: connection, speed and activity |
If the green STS LED and the green LK/ACT LED are solid ON:
|
|
LK/ACT |
Green |
||
|
If the green STS LED is solid ON and the green LK/ACT LED is solid OFF:
|
|||
|
If the green STS LED is solid ON and the green LK/ACT LED is blinking: there is an activity |
Use the 5 LEDs on the face of the LTM E expansion module to monitor its state:
|
LTM E LED |
Color |
Describes |
Indicates |
|---|---|---|---|
|
Power |
Green or red |
Module power or internal trip condition |
|
|
Digital Inputs I.7, I.8, I.9 and I.10 |
Yellow |
State of input |
|
Use with TeSys T LTM CU Control Operator Unit
Available Functions
Once connected to the LTM R, the LTM CU can be used to:
-
configure parameters for the LTM R controller,
-
display information about the LTM R controller configuration and operation,
-
monitor trips and alarms generated by the controller,
-
control the motor locally using the local control interface.
LTM CU Front Face

Navigation Keys
The LTM CU navigation keys are contextual, that is, their function depends on the associated icons shown on the LCD display. These icons change for different displays, so the navigation key functions also change.
The navigation keys can be used to:
-
navigate menus and sub-menus,
-
scroll within a value list,
-
select a setting in a value list,
-
exit a value list without making a selection,
-
return to the main (first-level) menu,
-
switch between manual and automatic presentation mode in Quick View display.
The diagram below shows an example of the different functions of each of the navigation keys associated with an icon on the LCD display:

1 Information area of the LCD display
2 Contextual navigation icons area of the LCD display
3 Move up to the next higher-level menu
4 Move down to the next item in the menu
5 Select an item
6 Move up to the previous item in the menu
7 Return to the main menu
LCD Displays
The LTM CU presents 3 different LCD displays:
|
LCD display |
Functionality |
|---|---|
|
Menu |
|
|
Quick View |
|
|
Trips and alarms |
|
Contextual Navigation Icons
The following table describes the icons used with the contextual navigation buttons on the LTM CU:
|
Icon |
Description |
Icon |
Description |
|---|---|---|---|
|
|
Enables access to the main menu from a sub-menu or from Quick View |
|
Enables access to Quick View from the main menu or a sub-menu |
|
|
Scroll down |
|
Enables access to manual scroll mode (when Quick View is in automatic scroll mode) |
|
|
Scroll up |
|
Enables access to automatic scroll mode (when Quick View is in manual scroll mode) |
|
|
Validates a setting or value and enables access to a sub-menu when a menu is selected |
|
Used to increment a setting in menu mode |
|
|
Move up to the next higher-level menu |
|
Used to decrement a setting in menu mode |
|
|
When a menu item is password-protected, this icon enables access to the Enter Password screen |


Information Icons
The following table describes the icons provided as information in the information area of the LCD display. They indicate, among others, the selected menu or parameter:
|
Icon |
Description |
Icon |
Description |
|---|---|---|---|
|
|
Main menu |
|
Indicates that the present display is Quick View |
|
|
Metering setting menu |
|
Indicates that an alarm has occurred |
|
|
Protection setting menu |
|
Indicates that a detected error has occurred |
|
|
Control setting menu |
|
Information |
|
|
Services menu |
|
Check box selected |
|
|
Language selection menu |
|
Check box unselected |
|
|
Radio button selected |
|
Item has been selected (for inclusion in Quick View display) |
|
|
Radio button unselected |
|
LTM R in Configuration mode |


Example of an HMI Display
Here is an example of HMI LCD displaying an average current of 0.39 A in local control, run mode:

1 Quick View display icon
2 Name of the setting currently displayed
3 Motor state
4 Short key to main menu
5 Manual scroll mode icon; pressing the associated contextual navigation key switches to manual scroll mode
6 Value of the setting currently displayed
Network Communication on Modbus/TCP
Wire the Communication Port
This procedure is shown on the Instruction sheets provided with the LTM R and the LTM E, and described in Installation chapter of the User Manual:

1 Premium PLC with an Ethernet coupler
2 Straight or crossed shielded twisted pair connection cable (490NT•000•••)
3 ConneXium switch
4 TeSys T LTM R Modbus/TCP controller
Parameters Used in the Application Example
For the application example, the following parameters are used:
|
LTM R Modbus/TCP Controller |
|
|---|---|
|
IP address |
Served through DHCP |
|
Device name |
TeSysT001 |
|
Behavior on communication loss |
Trip and motor stop after 5 seconds |
|
Configuration mode |
Via network |
|
Fast device replacement |
|
|
PLC Ethernet Coupler |
|
|---|---|
|
Primary IP address |
192.168.2.3 |
|
Sub-network mask |
255.255.255.0 |
|
Gateway address |
192.168.2.200 |
|
Address server |
Use of DHCP to associate:
|
|
I/O scanning |
|
Set Up the LTM R Communication
Set up the LTM R communication with rotary switches and PowerSuite step by step:
|
Step |
Description |
Tool |
|---|---|---|
|
1 |
Configure Device Name |
With rotary switches |
|
2 |
Configure communication loss parameters |
With PowerSuite |
|
3 |
Select configuration mode and configure FDR function |
|
|
4 |
Download configuration from PC to LTM R controller |
|
|
5 |
Power cycle the LTM R controller to take into account the new communication parameters |
Device Name Configuration

Communication Loss Configuration

Select Configuration Mode and Configure FDR Function

Download Configuration from PC to LTM R

Power cycle the LTM R controller to take into account the new parameters.
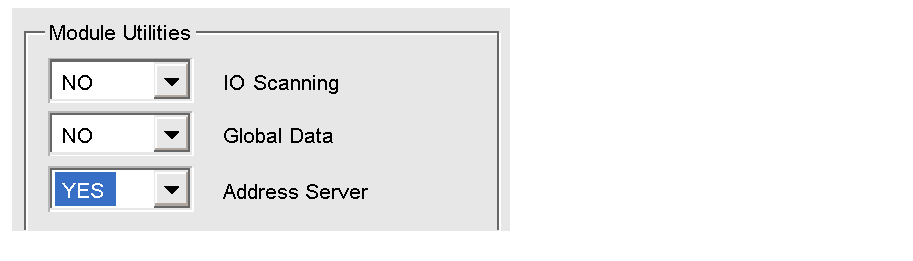
Set up the PLC Communication
Set up the communication between a PLC and the LTM R controller:
|
Step |
Description |
|---|---|
|
1 |
Declare the Ethernet network in the PLC. |
|
2 |
Configure the IP address of the Ethernet coupler. |
|
3 |
Configure the address server function of the Ethernet coupler. |
|
4 |
Configure the I/O scanning function. |
|
5 |
Validate the overall configuration. |
|
6 |
Associate the Ethernet configuration with the Ethernet module. |
|
7 |
Compile, save and transfer the project to the PLC. |
|
8 |
Test the communication via the debug screen. |
|
9 |
Via an animation table, check that the motor management controller is properly working. |
|
10 |
Using PowerSuite, transfer the parameter file from LTM R controller to PLC parameter file server. |
The example below describes how to configure the communication between a Premium PLC running Unity software and an LTM R controller.
Step 1
Declare the Ethernet network in the PLC.


Step 2
Configure the Ethernet_1 coupler IP address.

Step 3
Configure the address server function of the Ethernet coupler.

Step 4
Configure the IO Scanning function.


Step 5
-
Validate the global Ethernet configuration through the Edit menu.
-
When the Modification Authorization box pops up, click Yes to confirm the edit.
Step 6
Associate the Ethernet configuration with the Ethernet module.


Step 7
-
Compile, save and transfer the project to the PLC.
-
Connect the PC to the PLC.
Step 8
Check that the communication is working via the setting screen:

Step 9
Via an animation table, check that the motor management controller is properly working.
-
In the Project Browser window, right-click Animation Tables sub-menu and select New Animation Table item.
-
In the Properties window which opens, select a name and click OK.
-
Select one by one the words corresponding to the IO Scanning table:
-
%MW0 to %MW3 for the input variables (LTM R status),
-
%MW10 for the output variable (LTM R control).
-
The animation table enables you to check LTM R global status and to control the motor: 
Step 10
Using PowerSuite transfer configuration from LTM R controller to PLC parameter file server:
-
Connect the PC to the LTM R controller.
-
In the menu, select LTMR to parameter server to transfer the configuration file from LTM R controller to PLC parameter file server, as shown below:

In case of a Fast Device Replacement, the file will automatically be downloaded from PLC parameter file server to the new LTM R controller.
See the User Manual for more details.
