
LTMR: Modbus™ RTU, CANopen, DeviceNet, and Profibus
Introduction and Setup — LTMR: Modbus RTU, CANopen, DeviceNet and Profibus
This chapter describes how to upgrade / downgrade a TeSys T firmware version for LTMRxxMxx (Modbus), LTMRxxCxx (CANopen), LTMRxxDxx (DeviceNet) or LTMRxxPxx (Profibus). It explains how to prepare the LTMR and the PC, how to connect them and how to run the programmer.
One physical link must be established between your PC and the LTMR, from a USB port on the PC to the “LTME/HMI” port on the left side of the front face of the LTMR unit. To do so, use the TCSMCNAM3M002P cable. Route the cable to the outside of the enclosure so the update can be performed without exposure to energized equipment (doors closed and interlocked). The Ethernet version of TeSys T requires a Cat5 cable.

Use a separate, externally supplied control power connection that is switched from outside of the enclosure. The control voltage supply must match the LTMR input voltage. With the power OFF, connect power to the “A1, A2” terminals of the LTMR (input polarity is indicated for DC models). Route the cable to the outside of the enclosure so the update can be performed without exposure to energized equipment (doors closed and interlocked).
Prepare your PC: Connection through USB to Serial
-
Download and install “SoMove v2.6” or greater and “TeSys DTM Library v2.10.0” or greater.
-
Unzip and run the SoMove executable file.
NOTE: This will also install the Modbus Driver Suite for cable TCSMCNAM3M002P. -
Unzip and run the TeSys DTM Library executable file.
NOTE: The file may run with no pop-up windows. -
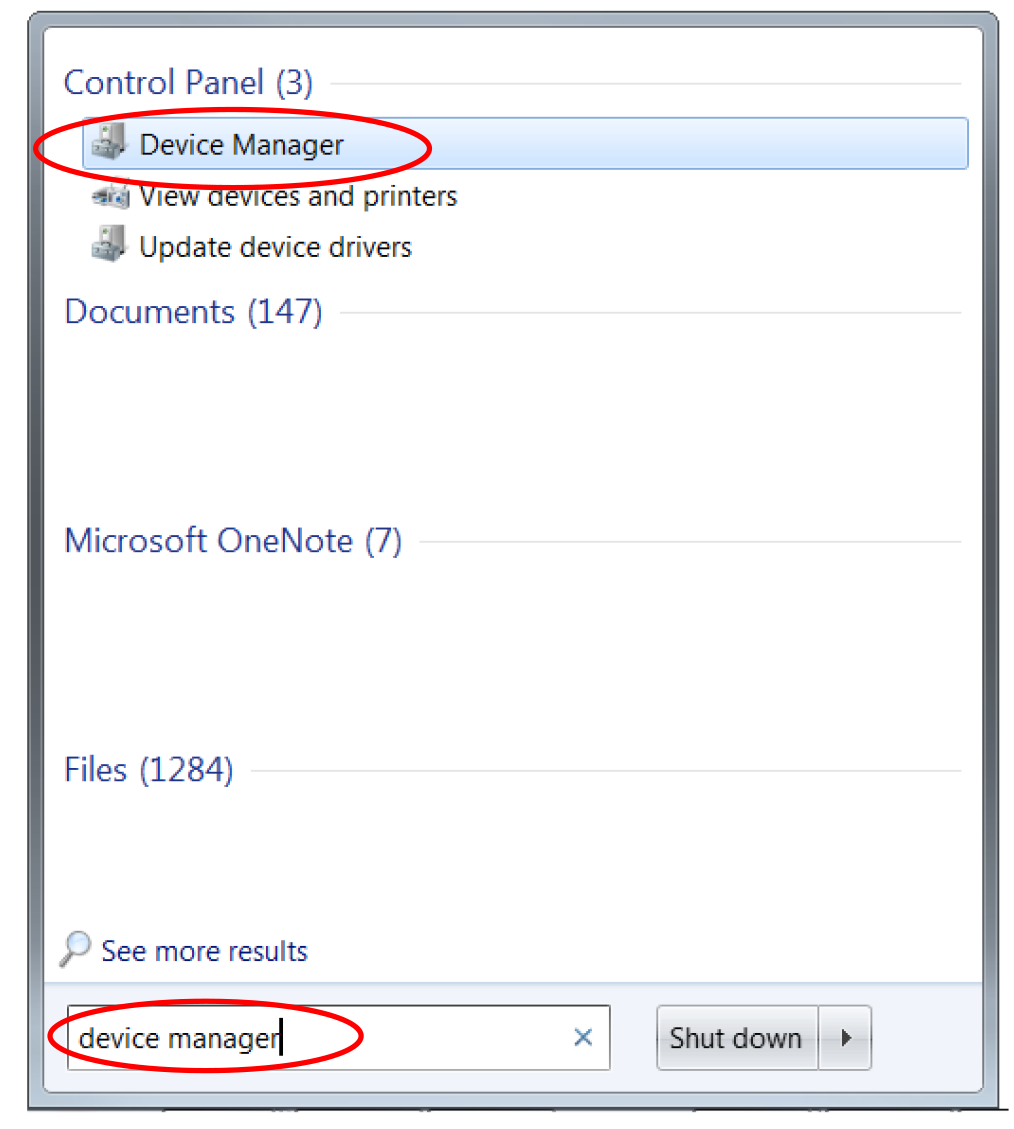
Identify the USB COM port used by the TCSMCNAM3M002P cable.
To do so, connect the cable at both ends, click the Start menu on your PC and search for “Device Manager.” Open the Device Manager, click on Ports (Com & LPT), and read the number of the port associated with TSX C USB 485. In the example below, it is COM12.
|

|
Using TeSys Programmer Tool
IMPORTANT: Changing the firmware version of the TeSys T through the programmer provides an automatic restore function for the product configurations. Before changing the firmware version, it is recommended to save a backup of the product configuration through the TeSys T Device Type Manager (DTM) using SoMove Software. The programmer can be used for both firmware upgrades and firmware downgrades. Below is an example of downgrading the firmware from FW2.6 to FW2.5.
-
Open the TeSys Programmer Tool from one of the following locations:
-
Navigate to “C:\Program Files (x86)\Common Files\Schneider Electric Shared\TeSysDTMLibrary\TeSysT\TeSysProgrammer” and run “TeSysProgTool.exe.”
- In SoMove:
-
Click on the “Disconnect from Device” icon on the “Main” toolbar.
-2019-12-06-14-07-30-0001_0000395903.png)
-
Choose “Firmware Update” from “Device → Maintenance.”
-
 A warning message is displayed, stating that the TeSys Programmer
is to be used for TeSys T firmware change (upgrading to a new version
or downgrading to a former version) and not for setting the configuration
parameters of the TeSys T. Read the message and click "Proceed." If
“Cancel” is selected, the programmer exits.
A warning message is displayed, stating that the TeSys Programmer
is to be used for TeSys T firmware change (upgrading to a new version
or downgrading to a former version) and not for setting the configuration
parameters of the TeSys T. Read the message and click "Proceed." If
“Cancel” is selected, the programmer exits.

-
-
From the drop-down menu located underneath the TeSys T controller graphic, select the COM port associated with “TSX C USB 485.” In this example, it is COM 12. Click on the “Connect” button to connect to the TeSys T controller. Once connected, the “Connected Device Info” fields will populate.


-
In the “Firmware Package Selection” field, click the “Change Path” button, and navigate to the directory of unzipped TeSys T firmware files. Select the correct firmware package from the “Select Firmware” drop-down. Verify that the updated version has appeared in the Device firmware Version field.


-
You are now ready to upgrade the TeSys T. To begin the firmware upgrade, click the “Update” button.
 NOTE: Firmware upgrade can take up to ten minutes.
NOTICE RISK OF FIRMWARE CORRUPTION
Once the firmware upgrade has begun, adhere to the following until the programming process is complete:- Do not close the TeSys Programmer until the process is complete.
- Do not interrupt power to the device.
- Do not disconnect the communication cable if programming is in progress.
Failure to follow these instructions can result in equipment damage. -
A pop-up window will appear, requesting you to power cycle the LTMR.

-
Once the “Total Progress” bar reaches 100%, a pop-up window will appear, indicating a successful LTMR firmware upgrade. Press “OK,” power-cycle the device again and wait 20 seconds. Then, click the “Connect” button.


-
After clicking the “Connect” button, the new firmware version should populate.

-
The firmware update is finished and you can exit the TeSys Programmer or continue using the tool.
NOTE: If you access your TeSys T through a LTMCU, depending on the firmware upgrade performed on TeSys T, you may have to update the language files of your TeSys T.If this occurs, and the language files in the LTMCU are not updated, the LTMCU displays “Error in languages” when connected to TeSys T.It is nevertheless possible to operate temporarily both the TeSys T and the LTMCU, but the new TeSys T configuration parameters introduced by the new TeSys T firmware version will not be accessible. The LTMCU languages must be updated to access the TeSys T configuration parameters introduced by the new TeSys T firmware version. To do so, use the LanDown tool and refer to the LTMCU User Manual.
LTMCU language file update may be necessary when LTMR is upgraded based on the following compatibility rules:-
LTMR firmware version 2.5 or 2.6
-
LTMCU language version must be 1.200 or higher.
-
-
LTMR firmware version 2.7 or higher
-
LTMCU language version must be 1.300.
-
-