
IFM Interface
Introduction
Overview
The IFM Modbus-SL interface for one circuit breaker enables an intelligent modular unit (IMU) with a ComPacT, PowerPacT or MasterPacT circuit breaker, to be connected to a two-wire Modbus-SL RS-485 serial line Modbus network. Each circuit breaker has its own IFM interface and a corresponding Modbus address.
Types of IFM Interface
The part number of the IFM interface is LV434000. The IFM interface part number LV434000 completely replaces the IFM interface with part number TRV00210 or STRV00210.
-
The IFM interface data for the IFM interface with part number LV434000 is the same as for the IFM interface with part number TRV00210 or STRV00210.
-
The IFM interfaces with part number TRV00210 or STRV00210 are not compatible with MasterPacT MTZ circuit breakers.
IFM Interface Features
The main features of IFM interface are:
-
Single Modbus serial line interface provided in
-
RJ45 connector interface
-
Stacking connection interface
-
-
HMI rotary dials for address settings and padlock option
-
Push-button for test functionality
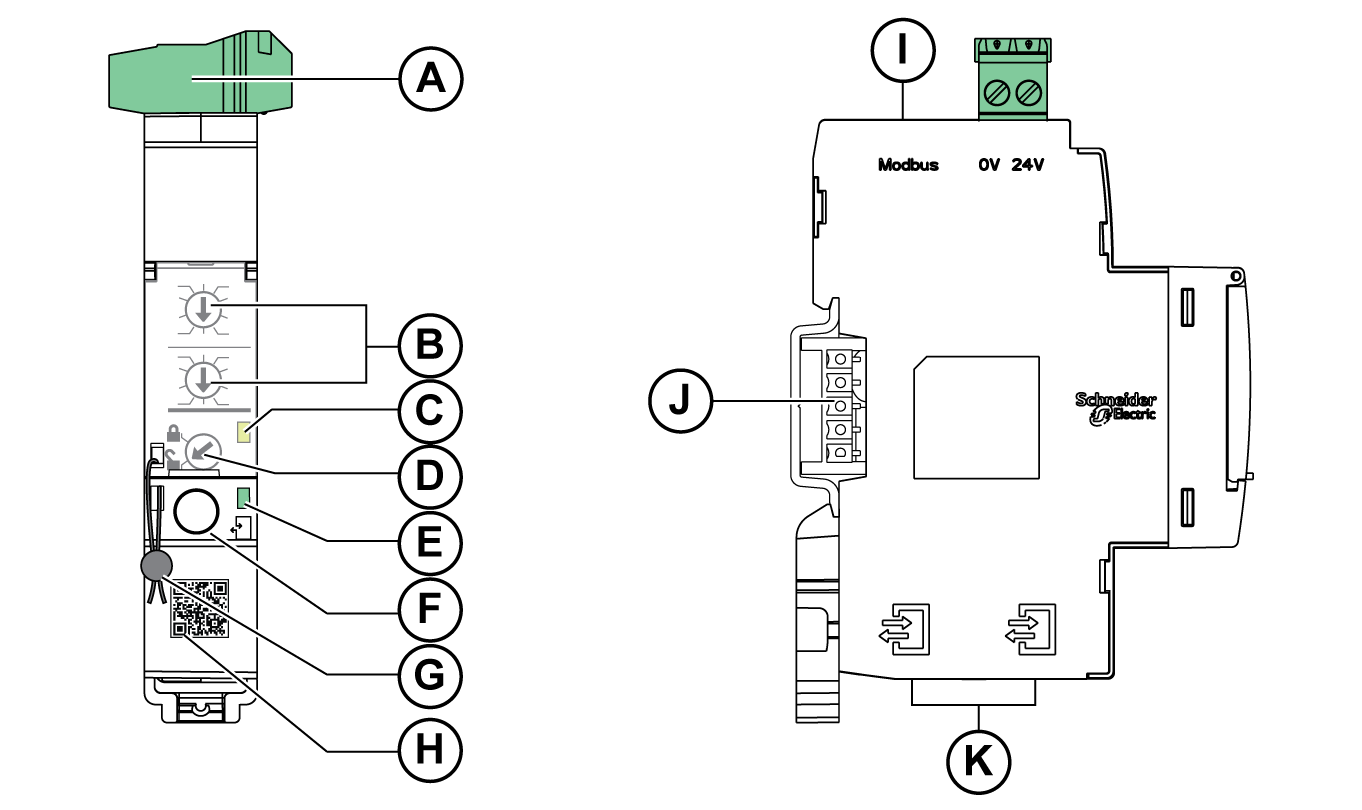
Hardware Description
General Description
|
A |
24 Vdc power supply terminal block |
|
B |
Modbus address rotary switches |
|
C |
Modbus traffic status LED |
|
D |
Modbus locking pad |
|
E |
ULP status LED |
|
F |
Test button |
|
G |
Mechanical lock |
|
H |
QR code to product information |
|
I |
RJ45 Modbus-SL port |
|
J |
Stacking accessory connection (TRV00217, optional) |
|
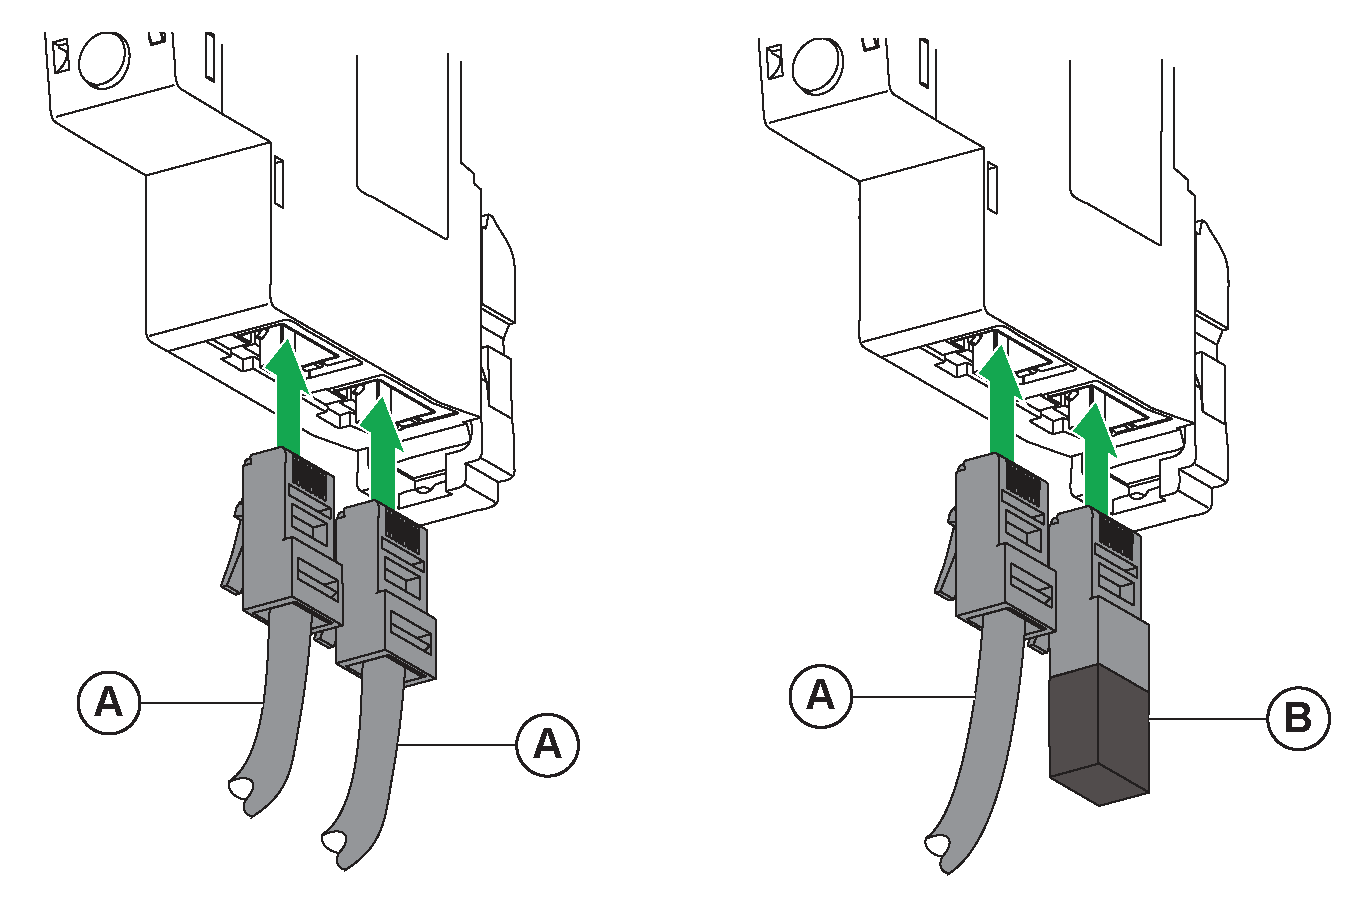
K |
2 RJ45 ULP ports |
For information on installation, consult the instruction sheet available on Schneider Electric website: NVE85393.
Mounting
The IFM interface is a DIN rail mounting device. The stacking accessory enables the interconnection of several IFM interfaces without additional wiring.
24 Vdc Power Supply
The IFM interface must always be supplied with 24 Vdc:
-
IFM interfaces stacked to an IFE server are supplied by the IFE server and it is not necessary to supply them separately.
-
If IFM interfaces are stacked without IFE server, only one of the IFM interfaces must be supplied with 24 Vdc.
-
A single IFM interface must be supplied with 24 Vdc.
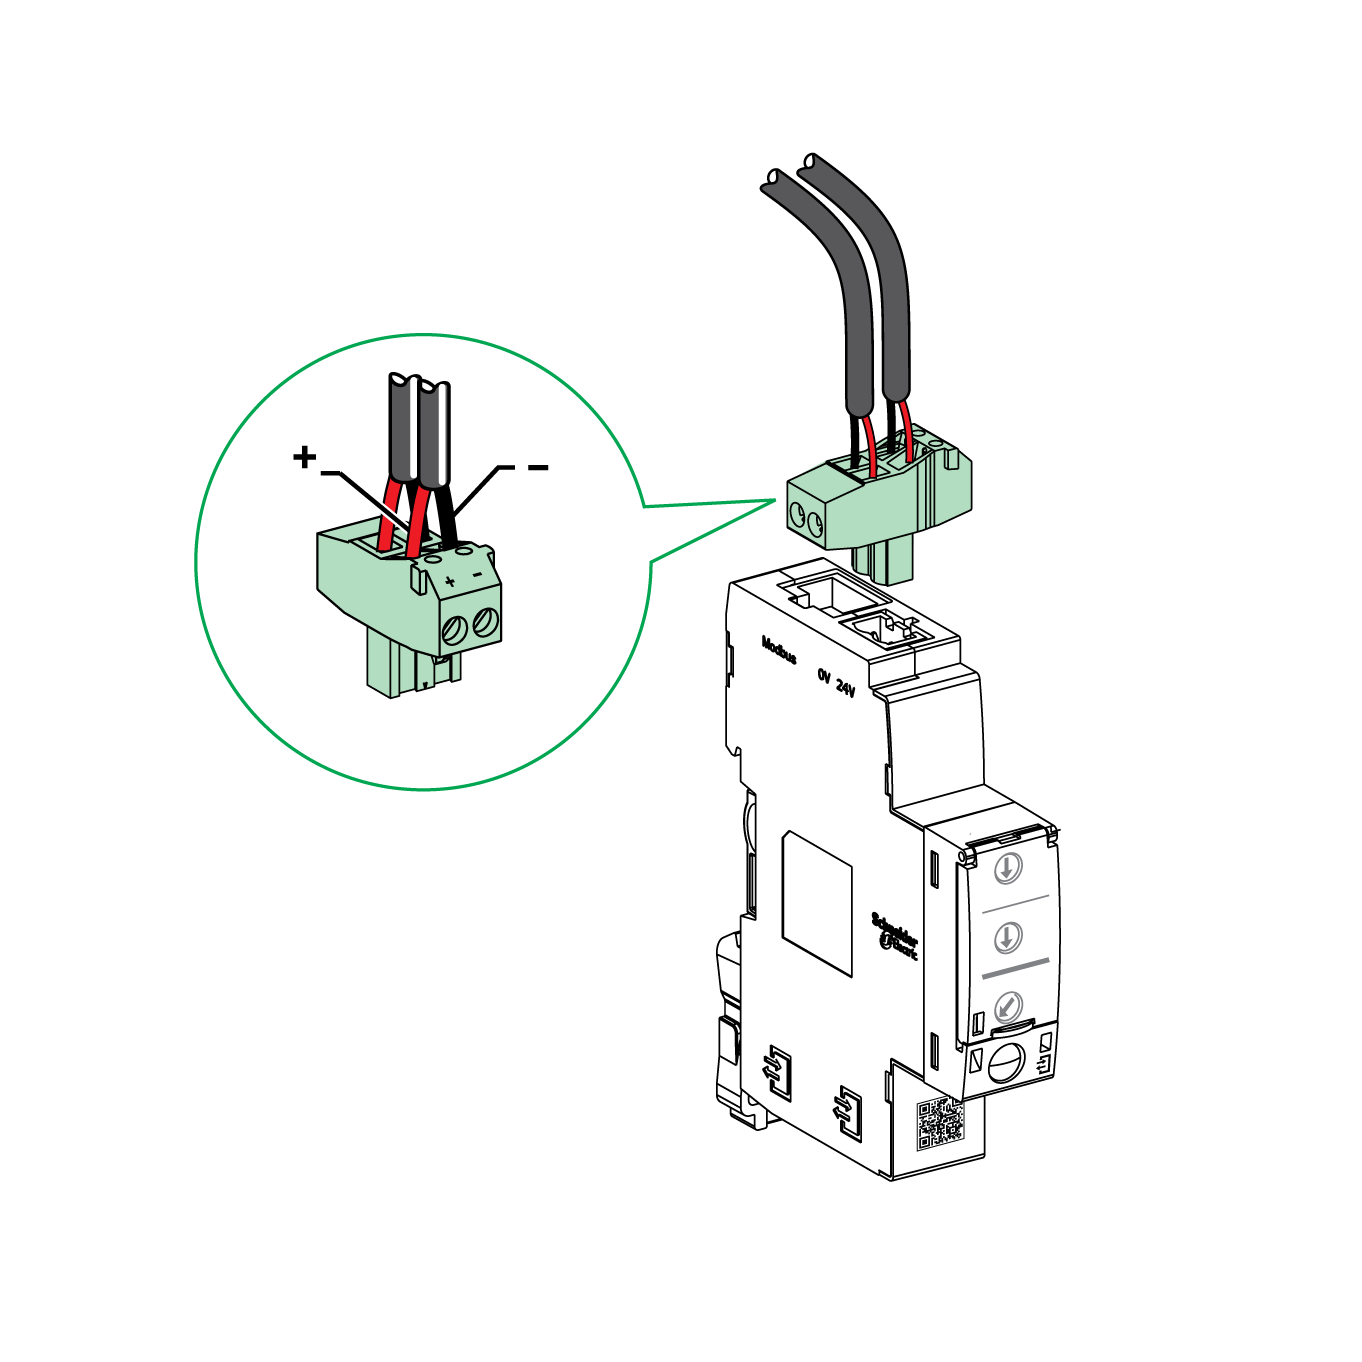
It is recommended to use an UL listed/UL recognized limited voltage/limited current or a class 2 power supply with a 24 Vdc, 3 A maximum.
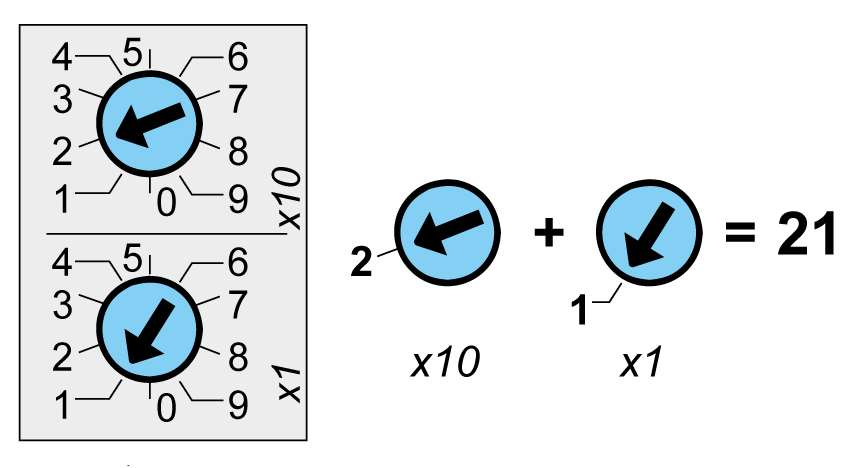
Modbus Address Rotary Switches
The IFM interface bears the Modbus address of the IMU to which it is connected. See the ULP System User Guide for more information regarding the IMU.
Define the Modbus address using the two address rotary switches on the front panel of the IFM interface.
The address range is 1 to 99. Do not to use the address 0, because it is reserved for broadcasting commands.
The IFM interface is initially configured with address 99.
Modbus Traffic Status LED
The Modbus traffic status LED provides information about the traffic transmitted or received by the IMU over the Modbus network.
-
When the Modbus address rotary switches are on value 0, the yellow LED is steady ON.
-
When the Modbus address rotary switches are on value anywhere from 1 to 99, the yellow LED is ON during the transmission and reception of messages, OFF otherwise.
Modbus Locking Pad
The Modbus locking pad on the front panel of the IFM interface enables or disables remote control commands to be sent over the Modbus network to the IFM interface itself, and to the other modules of the IMU.
-
If the arrow points to the open padlock (factory setting), remote control commands are enabled.

-
If the arrow points to the closed padlock, remote control commands are disabled.

The only remote control commands that are enabled even if the arrow points to the closed padlock are the Set Absolute Time and Get Current Time commands List of IFM Interface Commands.
Test Button
The test button tests the connection between all the ULP modules connected to the IFM interface.
Pressing the test button launches the connection test for 15 seconds.
During the test, all the ULP modules keep working normally.
ULP Status LED
The yellow ULP status LED describes the mode of the ULP module.
|
ULP status LED |
Mode |
Action |
|---|---|---|
|
|
Nominal |
None |
|
|
Conflict |
Remove extra ULP module |
|
|
Degraded |
Replace IFM at the next maintenance operation |
|
|
Test |
None |
|
|
Non-critical firmware discrepancy |
Use EcoStruxure Power Commission software to check the firmware and hardware compatibility and follow the recommended actions. |
|
|
Non-critical hardware discrepancy |
|
|
|
Configuration discrepancy |
Install missing features |
|
|
Critical firmware discrepancy |
Use EcoStruxure Power Commission software to check the firmware and hardware compatibility and follow the recommended actions. |
|
|
Critical hardware discrepancy |
|
|
|
Stop |
Replace IFM. |
|
|
Power off |
Check power supply |


Schematics With PowerPacT H-, J-, and L-Frame Circuit Breakers
General Description
Depending on the type of circuit breaker used, the user must connect the IFM interface using one of the following configurations:
-
Connection of the IFM interface to the MicroLogic trip unit.
-
Connection of the IFM interface to the BSCM module.
-
Connection of the IFM interface to the BSCM module or the MicroLogic trip unit.
For more information, refer to the ULP System User Guide.
ULP Connection
| NOTICE |
|---|
|
HAZARD OF EQUIPMENT DAMAGE
Failure to follow these instructions can result in equipment damage.
|
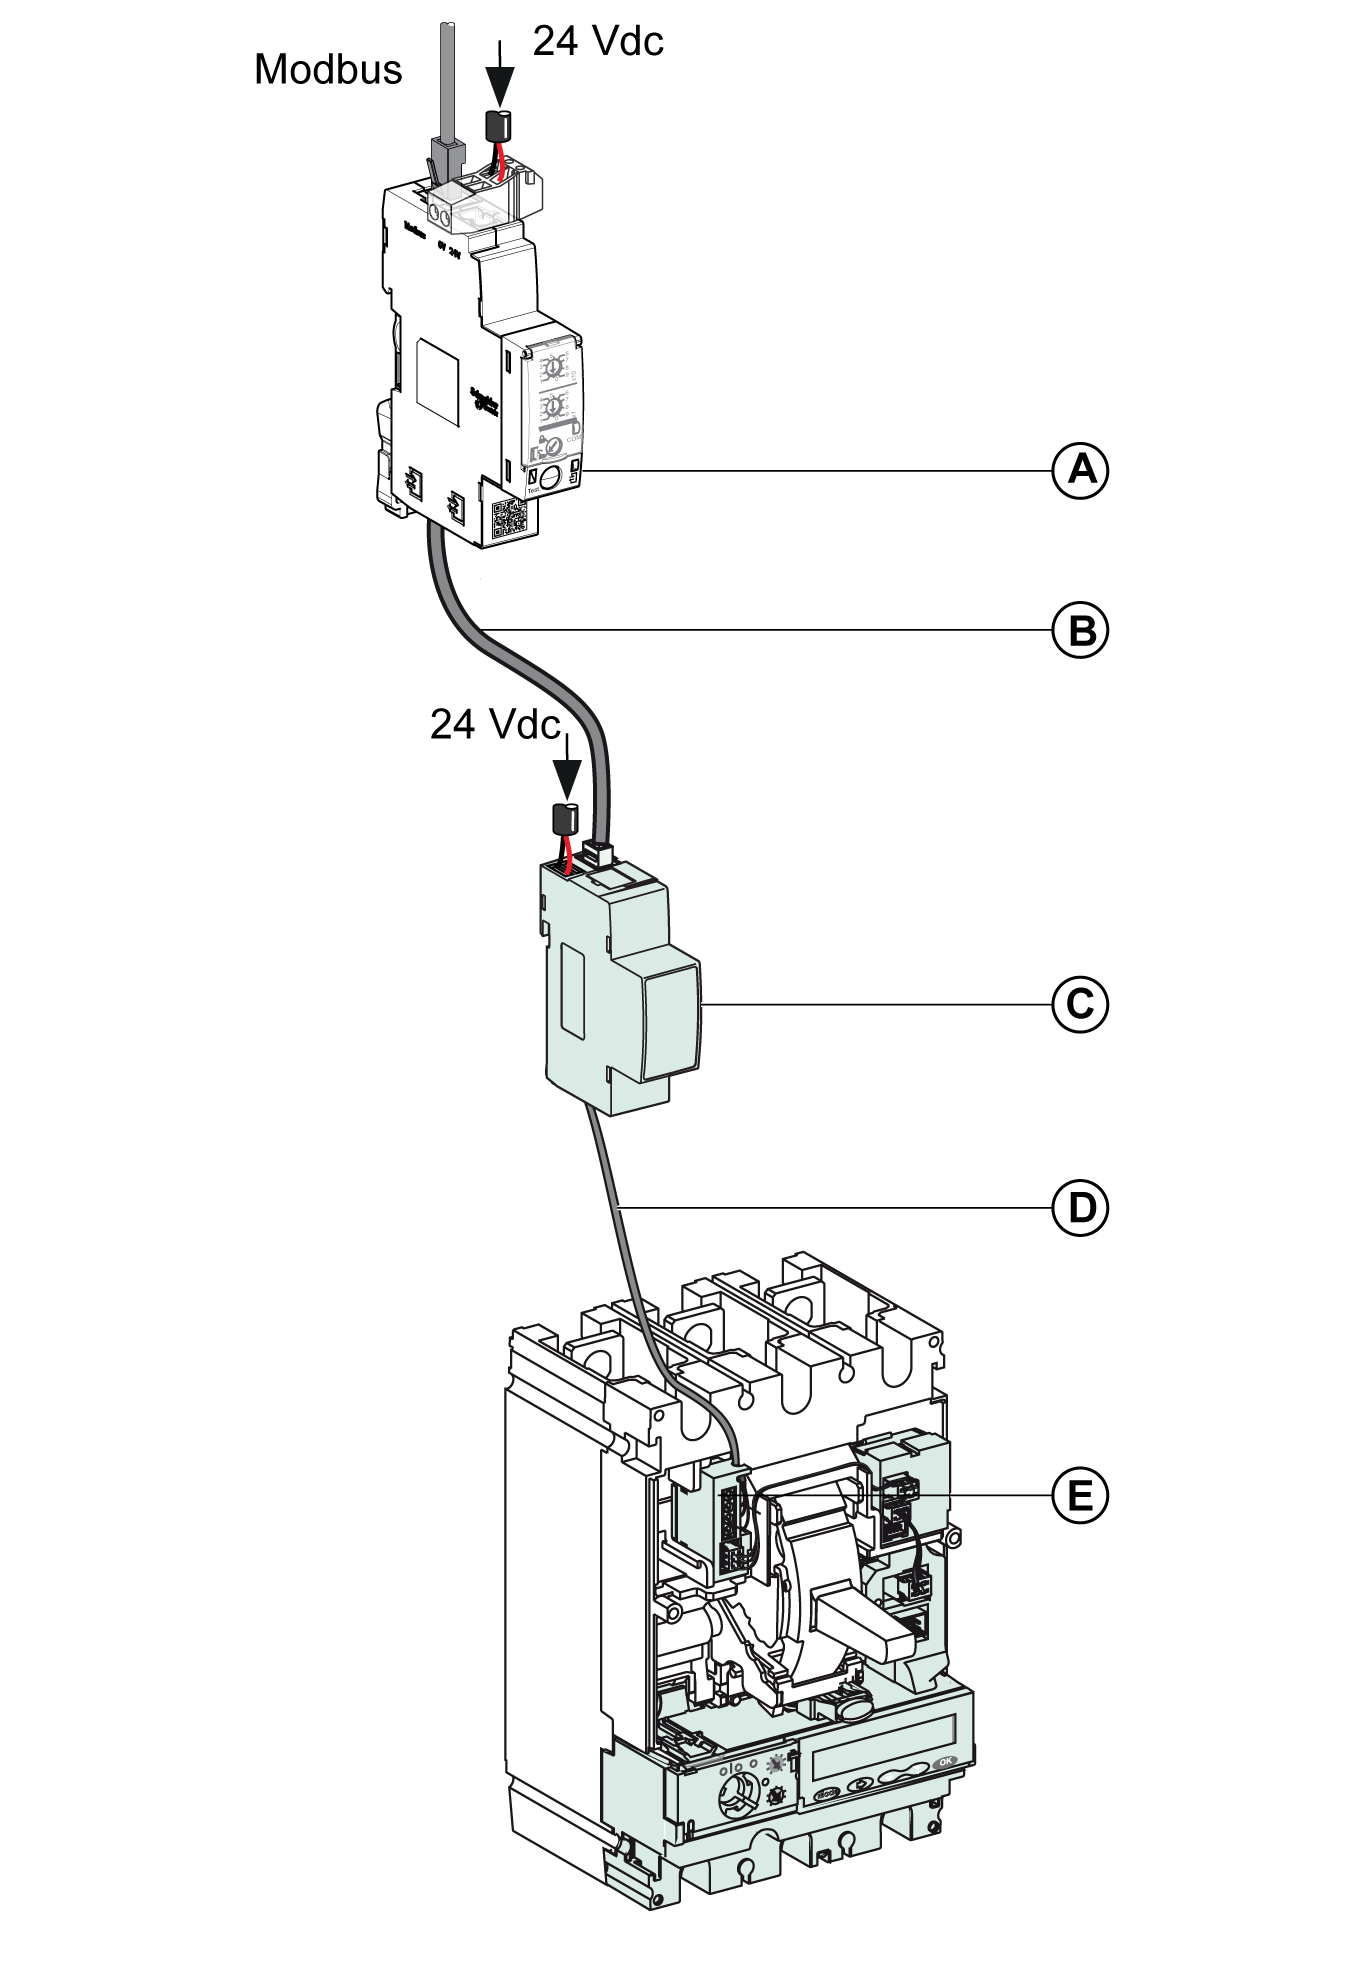
All the connection configurations require the NSX cord. The insulated NSX cord is mandatory for system voltages greater than 480 Vac.
Connection of the IFM Interface to the MicroLogic Trip Unit
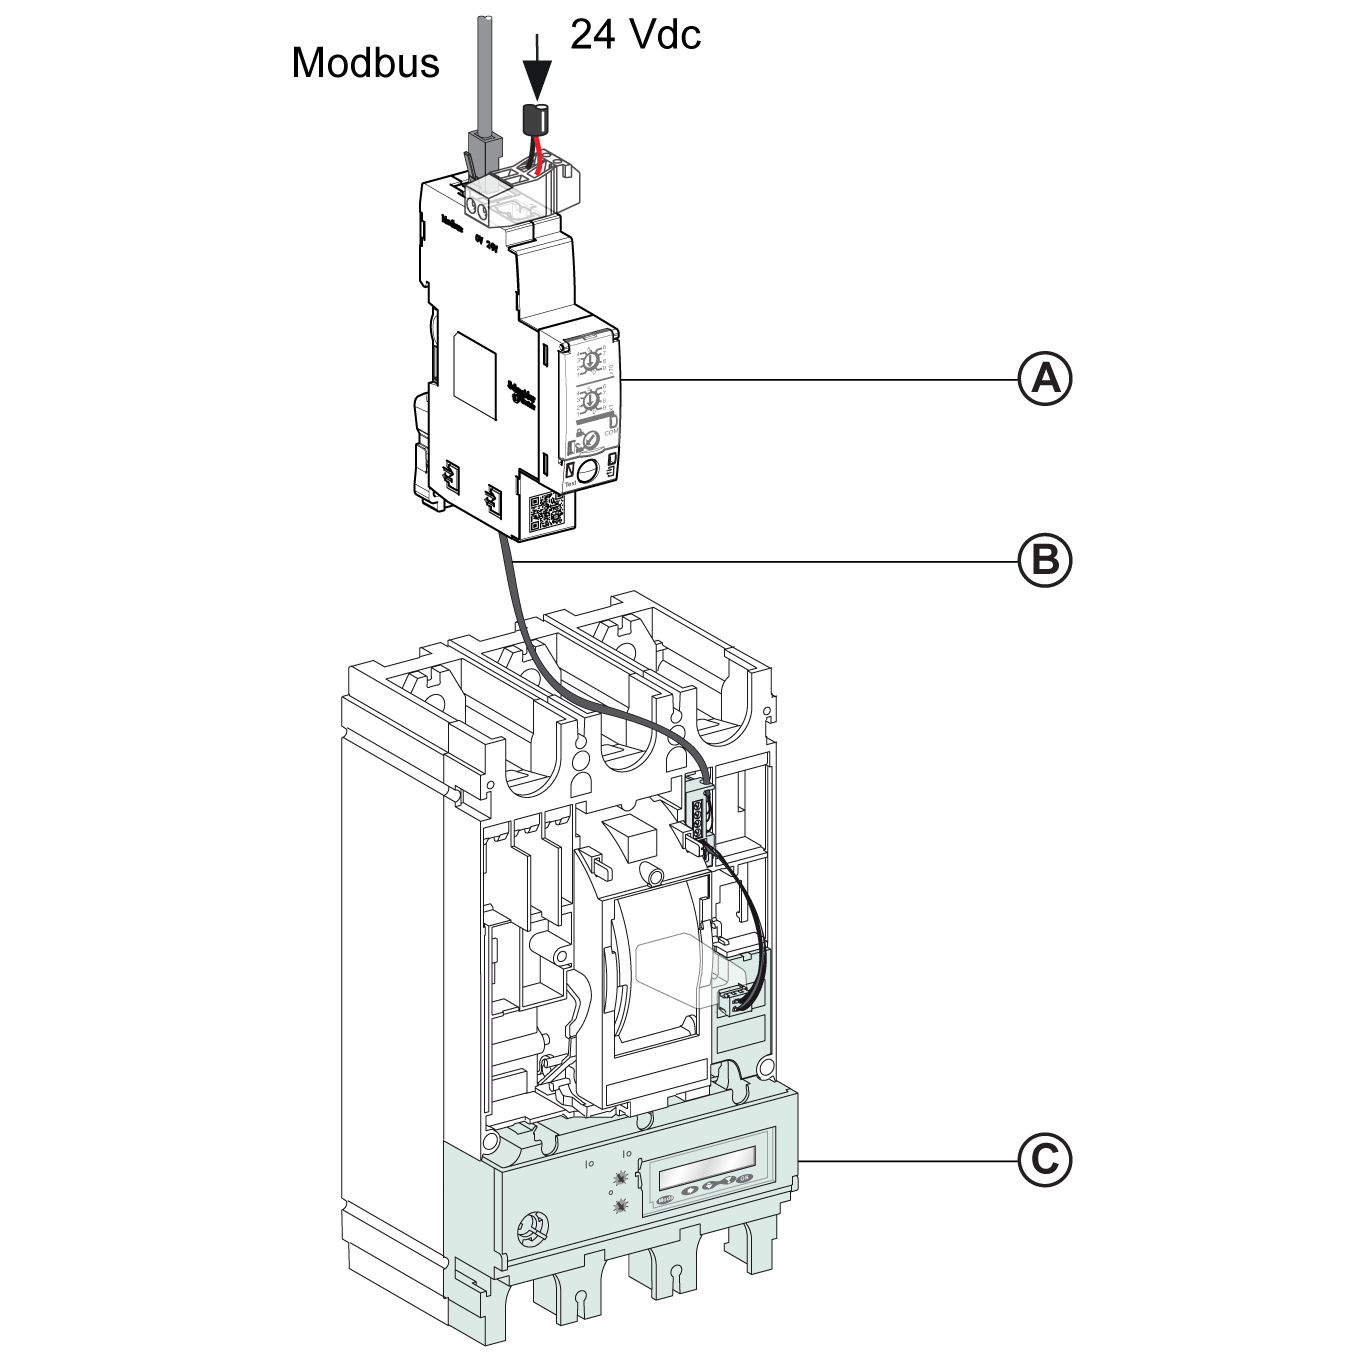
Connection of the IFM Interface to the BSCM Module
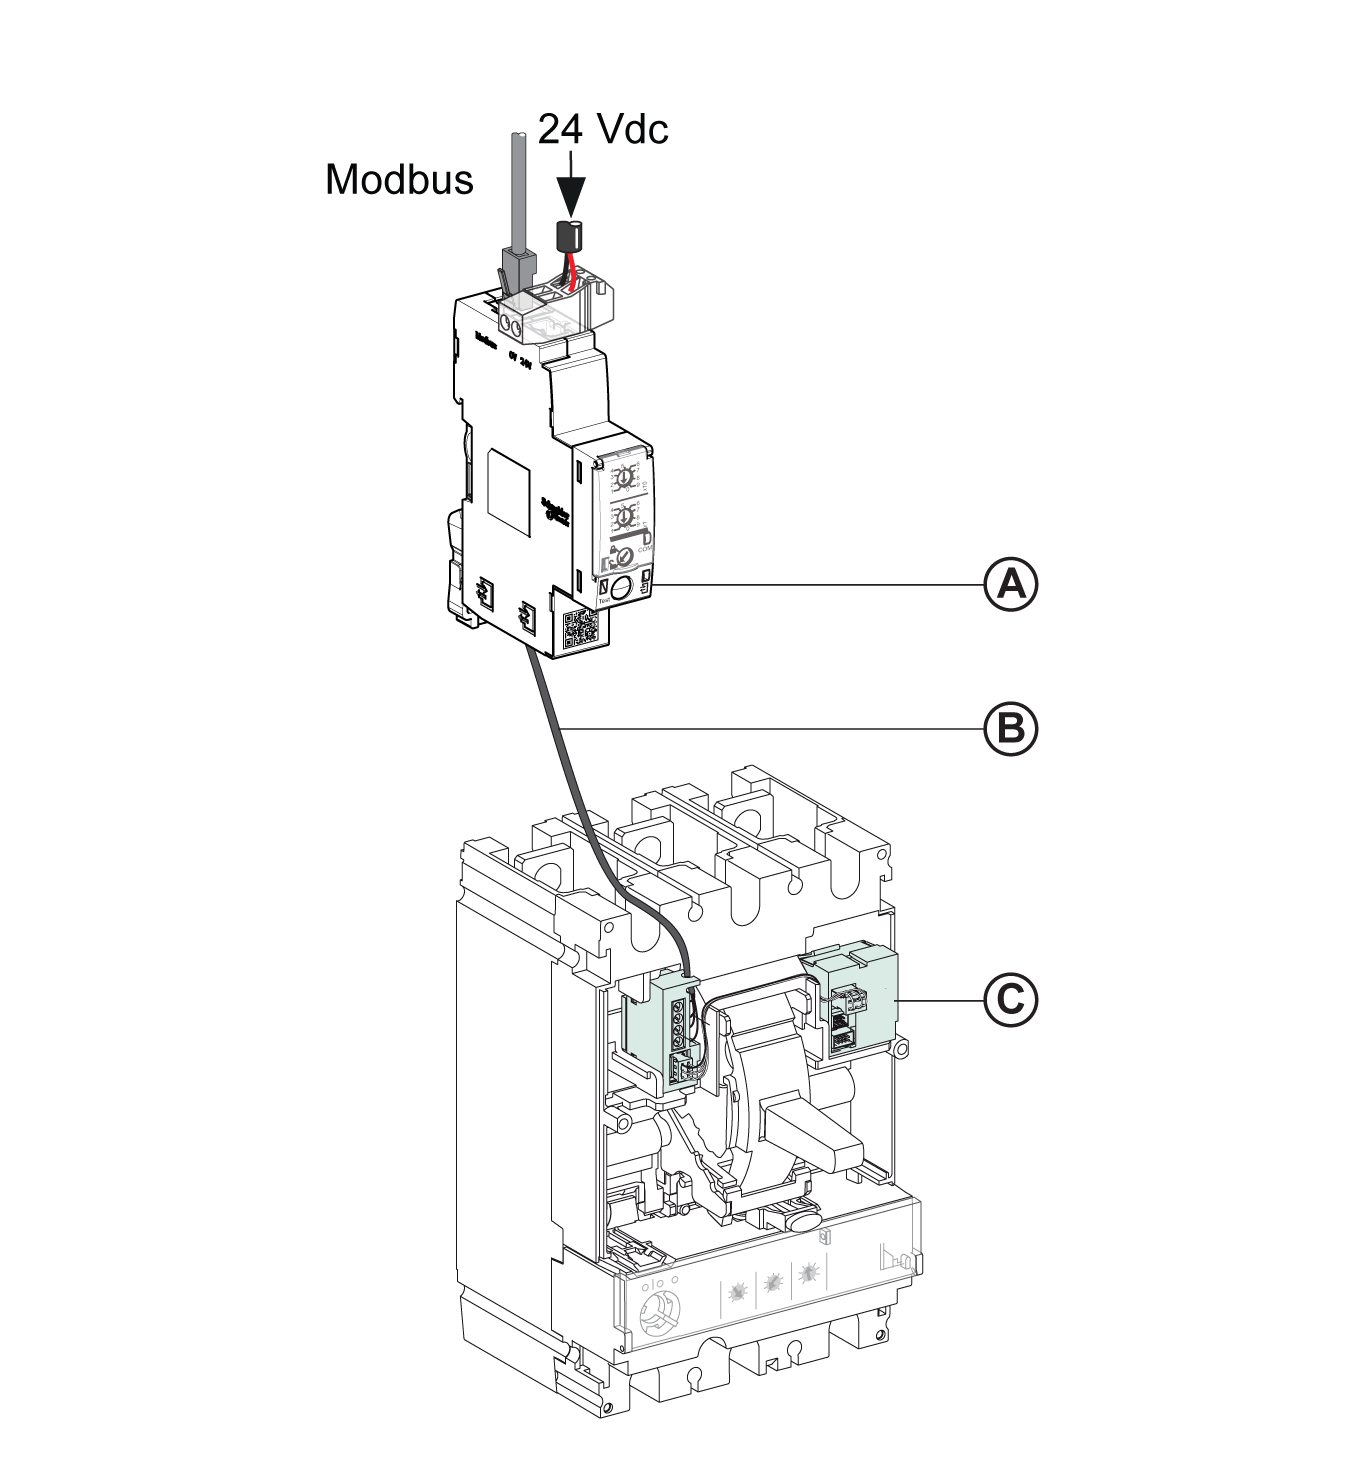
Connection of the IFM Interface to the BSCM Module and to the MicroLogic Trip Unit
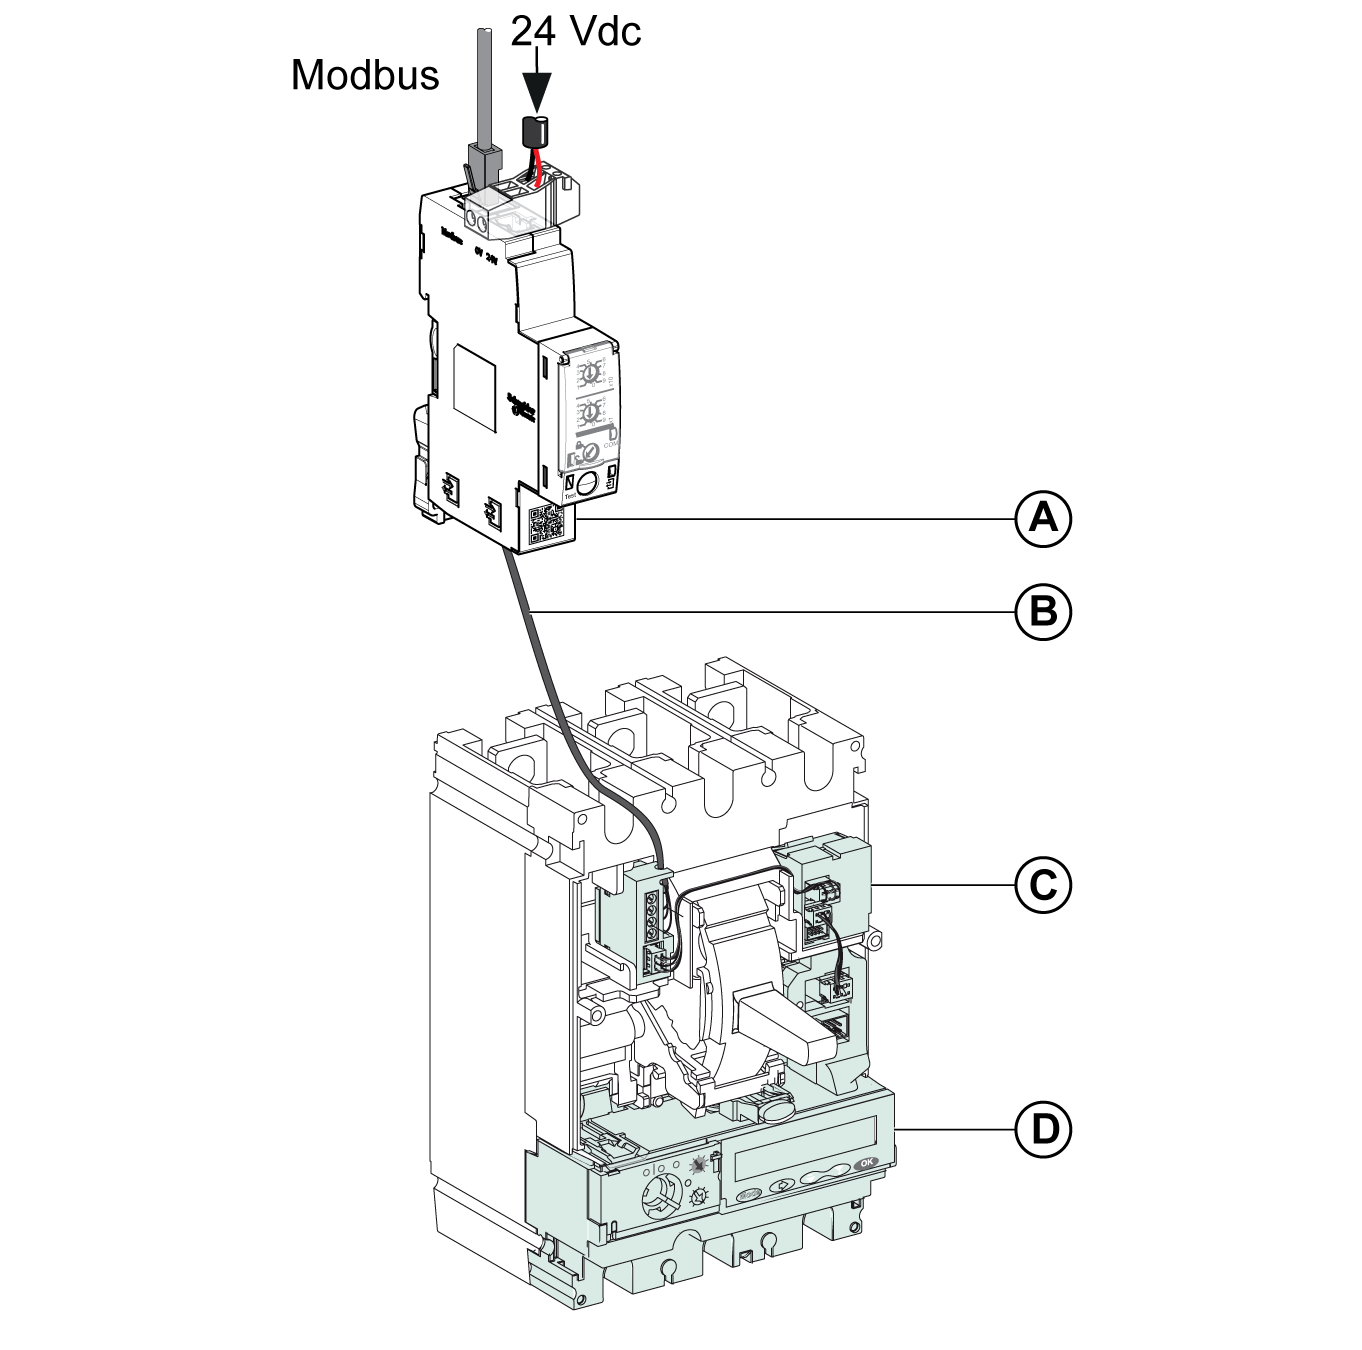
Connection of the IFM Interface to a Circuit Breaker for System Voltage Greater Than 480 Vac
Configuration
General Description
Two configurations of the IFM interface are available:
-
Automatic configuration (Auto-Speed sensing ON, factory setting): when connected to the Modbus network, the IFM interface automatically detects the network parameters.
-
Personalized configuration (Auto-Speed sensing OFF): the user can personalize the network parameters using the EcoStruxure Power Commission software.
Automatic Configuration
The Modbus slave address is defined by the two address rotary switches on the front panel of the IFM interface. When connected to the Modbus serial line network, the IFM interface automatically detects the network speed and parity. The Auto-Speed sensing algorithm tests the available Baud rates and parities and automatically detects the Modbus communication network parameters. The Modbus master must send at least 25 frames on the Modbus network in order to allow the Auto-Speed sensing algorithm to work.
The transmission format is binary with one start bit, eight data bits, one stop bit in case of even or odd parity, and two stop bits in case of no parity.
If the Auto-Speed sensing algorithm does not detect the network parameters, it is recommended to follow this procedure:
|
Step |
Action |
|---|---|
|
1 |
|
|
2 |
Send a Read Multiple Register request (function code 0x03) to slave 1, at any address and for any number of registers. |
|
3 |
Send this request at least 25 times. |
Personalized Configuration
The Modbus slave address is defined by the two address rotary switches on the front panel of the IFM interface.
Disable the Auto-Speed sensing option and set the following Modbus communication network parameters with the EcoStruxure Power Commission software:
-
Baud rate: 4800, 9600, 19200, and 38400 Baud.
-
parity: even, odd, and none (it is possible to select one stop bit or two stop bits in case of no parity).
Communication Test
Introduction
The use of the EcoStruxure Power Commission software is recommended to test the serial line communication on the various circuit breakers.
If the laptop or PC installed with the EcoStruxure Power Commission software and connected on the Modbus network is able to read data from the IMU, the communication is established. Refer to the EcoStruxure Power Commission Online Help.