Install the Bottom Entry Cabinet with the Galaxy VL UPS in System over 45 kAIC/kA Icw
 DANGER DANGER |
|---|
|
hazard of electric shock, explosion, or arc flash
Do not drill or punch holes with the gland plates installed
and do not drill or punch holes in close proximity to the cabinet.
Failure to follow these instructions will result in death or serious injury.
|
Use installation kit 0H-1818 and installation kit 0H-1816 (provided with the UPS), option kit GVLOPT012 (sold and shipped separately), and optional seismic kit GVLOPT002 (sold separately, if applicable) for this procedure.
- Remove the left side panel from the UPS.
- Remove the brackets (A) and (B) and (C) from the bottom entry cabinet. Install the brackets (A) on the rear of the bottom entry cabinet. Save the bracket (B) for top interconnection with the UPS. Discard the brackets (C), but save the screws for reuse.
- Install the two side plates (TME38565) from the optional kit GVLOPT012 on the right side of the bottom entry cabinet.
- Push the bottom entry cabinet into final position. Align with seismic anchoring, if present. For systems without seismic anchoring, reinstall the rear transportation bracket on the rear of the bottom entry cabinet and mount it to the floor.
- Lower
the front and rear leveling feet on the bottom entry cabinet with
a wrench until they connect with the floor. The casters must not have
contact with the floor. Use a bubble-leveler to check that the bottom
entry cabinet is level.
NOTICE Risk of equipment damageDo not move the cabinet after the leveling feet have been lowered.Failure to follow these instructions can result in equipment damage. - Prepare for
power and signal cables:
- Remove the middle front plate, the lower front plate, and the triangle covers from the bottom entry cabinet.
- Remove the gland plates for the signal cables and the gland plate for the power cables.
- Remove the two casters from the gland plate for power cables.
- Drill/punch holes for cables or conduits/grommets in the gland plates. Install conduits/grommets (not provided), if applicable.
- Reinstall the gland plates. Save the triangle covers, the lower front plate, and the middle front plate for final installation.
- Push the UPS into position next to the bottom entry cabinet. Align with seismic anchoring, if present.
- Lower
the front and rear leveling feet on the UPS with a wrench until they
connect with the floor. The casters must not have contact with the
floor. Use a bubble-leveler to check that the UPS is level.
NOTICE Risk of equipment damageDo not move the cabinet after the leveling feet have been lowered.Failure to follow these instructions can result in equipment damage. - Interconnect the bottom entry cabinet and the UPS in the front with screws as shown and install the top bracket (marked (B) on the illustration). The top bracket was removed from the top of the bottom entry cabinet in step 2.
- Remove the two special screws from the copper busbar in the UPS.
- Install two screws from installation kit 0H-1818 to refasten the copper busbar to the shelf.
- Install the two special screws for rear interconnection between the bottom entry cabinet and the UPS as shown.
- Route the signal cables through the bottom entry cabinet and into the UPS. Route as shown to separate the Class 2/SELV cables from the non-Class 2/non-SELV cables. A divider inside the cable channel in the UPS separates the cables. Follow the UPS installation manual to connect the signal cables.
- Route the input cables, the bypass cables, and the PE cables/equipment grounding conductor (EGC) up through the right half of the bottom entry cabinet and into the UPS.
- Route the battery cables, the neutral cables, and the output cables up through the left half of the bottom entry cabinet and into the UPS.
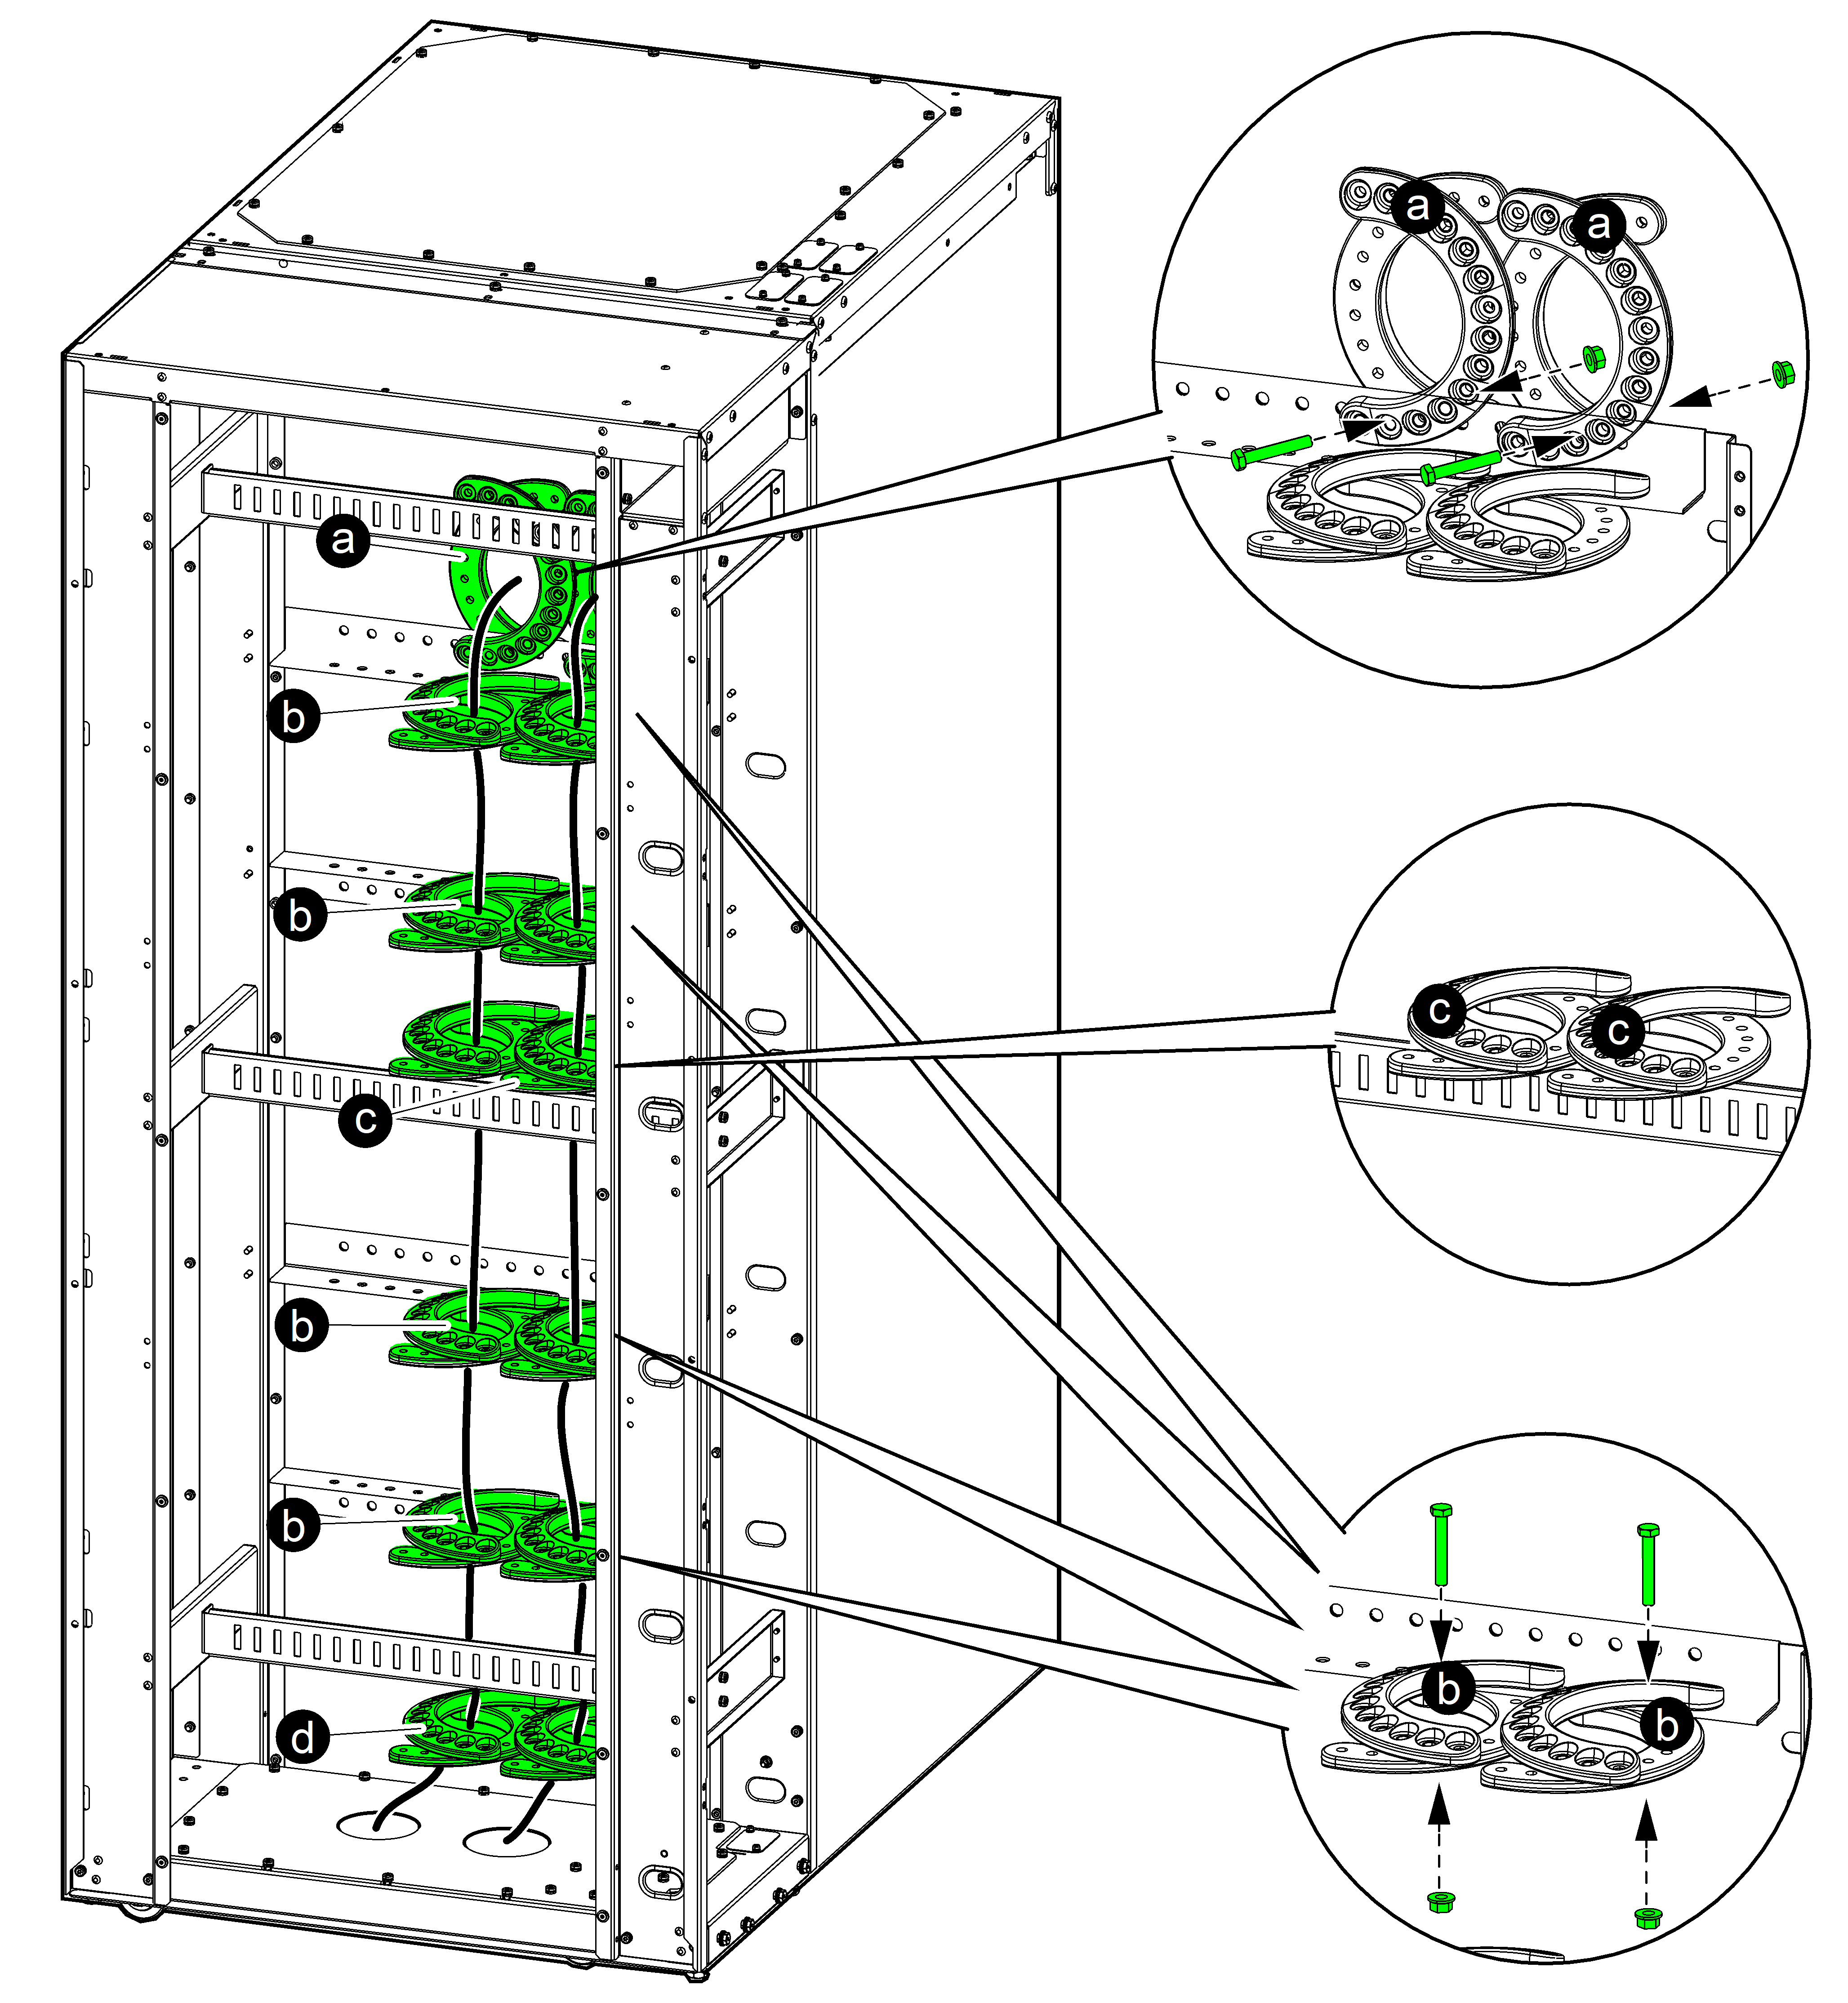
- Fasten the power cables with the provided plastic fastener
sets from installation kit 0H-1816 and option kit GVLOPT012 in the
shown positions in the bottom entry cabinet. Adjust the plastic fastener
sets to the power cables so they are fitted as tightly together as
possible. Place each plastic fastener set as described:
- Secure two plastic fastener sets in a vertical position to the side of the bottom entry cabinet with bolts and nuts.
- Secure eight plastic fastener sets in a horizontal position to the side of the bottom entry cabinet with bolts and nuts.
- Place two plastic fastener set resting on the bracket.
- Place two plastic fastener set between the bottom and the lowest side plate.
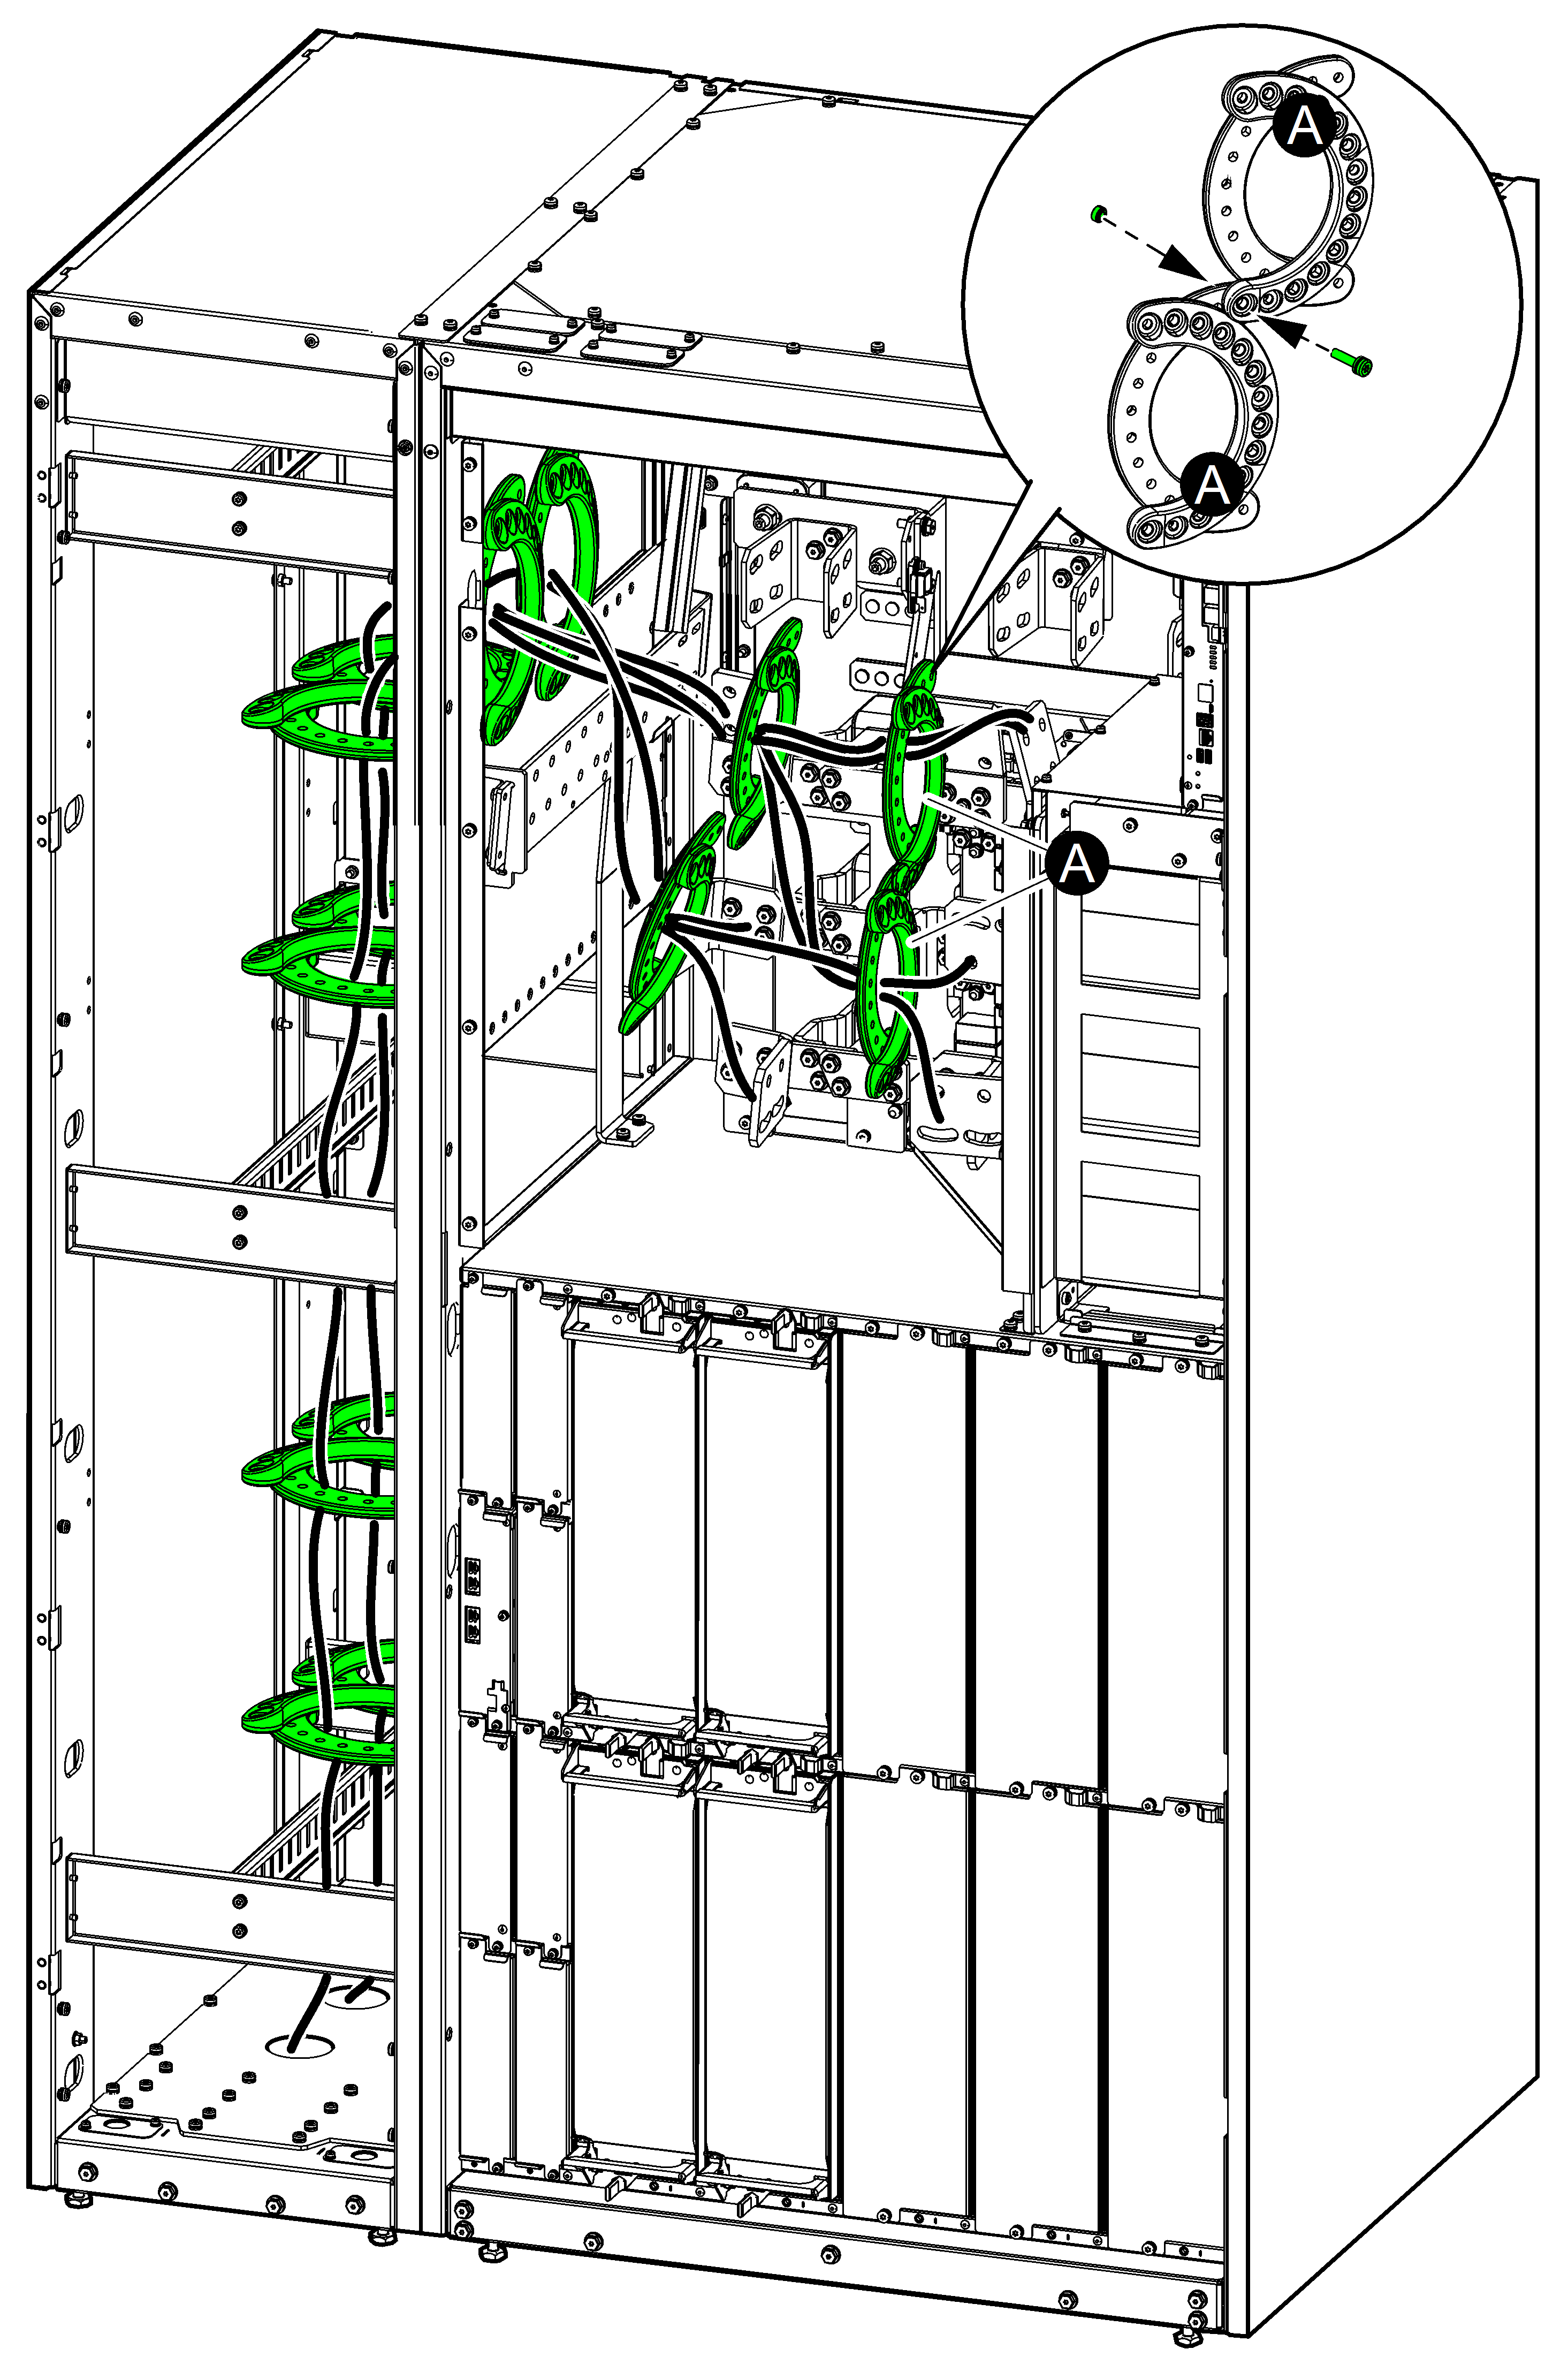
- Follow the UPS installation manual to connect the power cables to the busbars in the UPS.
- Fasten the power cables with four plastic fastener sets from installation kit 0H-1816 and option kit GVLOPT012 in the shown positions in the UPS. Adjust the plastic fastener sets to the power cables so they are fitted as tightly together as possible. Connect the two plastic fastener sets marked (A) together with a bolt and nut.
- Reinstall the triangle covers, the lower front plate, and the middle front plate on the bottom entry cabinet.
- For seismic anchoring: Install the seismic front anchoring bracket from the optional seismic kit GVLOPT002 on the UPS and the bottom entry cabinet and mount the seismic front brackets to the floor. Use appropriate hardware for the floor type – the hole diameter in the seismic front bracket is ø14 mm. The minimum requirement is M12 strength grade 8.8 hardware.


