
Enhance the ArcFM Locator to Search Duct Attributes in Conduit
Context
By default, the ArcFM Locator searches for ducts by their attributes by querying the duct feature class, however the ArcFM Locator tool does not query duct attributes within the conduit feature class. This is because, within the conduit, the duct attributes are stored in a separate duct definition table, which is viewable within the ArcFM Conduit Configuration dialog. The ArcFM Locator is unable to “reach” these fields when querying the conduit feature class.

However, you can configure the ArcFM Locator tool to include duct attributes when querying the conduit feature class by following the steps in subsequent topics.
Create ConduitDuctSearchInfo Model Name and Table
Create the model name CONDUITDUCTSEARCHINFO using these sub-steps:
-
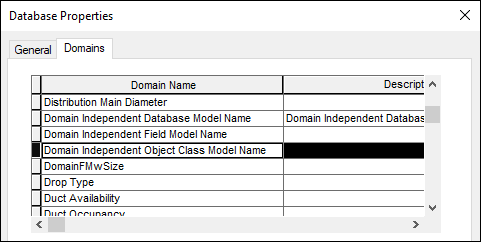
In ArcCatalog > Catalog Tree, right-click your database and choose Properties.
-
Click the Domains tab, if necessary.
-
Scroll down the list of domains until you find the Domain Independent Object Class Model Name domain, then click it once to highlight.
-
At the bottom of the dialog, under Coded Values, scroll down to the bottom of the list until you find the first empty row.
-
Type CONDUITDUCTSEARCHINFO for both the Code and the Description.
 NOTE: The fields do not accept a copy/paste. It looks like they do, but when you click OK, it clears them out. However, you can paste the model name in full, delete the last letter (in this case, “O”), then re-type it.
 -
Click Apply, then click OK to close the dialog.
Create a new object table called ConduitDuctSearchInfo by following these steps:
-
Coming up in a subsequent step, you add fields to the ConduitDuctSearchInfo table. These are the fields that you want to be able to search within the ArcFM Locator. Thus, before creating the new table, it is recommended to view your DuctDefinition table, and make a note of the fields you want to be able to query. Write down their field names and their data types. This example uses Material, DuctSize, and DuctType.

-
Further, along these same lines, it is easier for your users if they can use domains of values. So, take note of any domains assigned to your chosen fields.

-
Finally, coming up in a subsequent step, you mirror the model name assignments for these fields. So, make a note of which model names are assigned to these fields.

-
In the Catalog Tree, right-click your geodatabase and choose New > Table.
-
Type ConduitDuctSearchInfo for both Name and Alias.

-
Click Next.
-
Add the following fields (these are required):
-
ConduitGuid with a Data Type of GUID
-
ConduitObjectID with a Data Type of Long Integer

-
-
Then, add the fields you noted earlier in Substep A.

-
Assign these fields their domains (you took note of their domains earlier in these steps).
-
Click Finish.
Create a new object table called ConduitDuctSearchInfo by following these steps:
-
Register this new table as versioned following your normal database procedures because newly-created tables or feature classes are not versioned by default.
-
Add class and field model names to your new table.
-
Add the CONDUITDUCTSEARCHINFO class model name to the ConduitDuctSearchInfo table. This is the model name you created earlier in the Domain Independent Object Class Model Name domain.

-
Then, add the field model names you wrote down earlier for the fields you’ve included in the table. Duct field model names are in the Electric Field Model Name domain.

-
Click OK.
-
Install the Initialize Duct Search Tool
- In ArcCatalog, click Customize > Add-In Manager.

- In the Add-In Manager dialog, click Customize.
- In the Customize dialog, click Add From File.
- Navigate to C:\Program Files (x86)\Miner and Miner\ArcFM Solution\Bin\.
- In the Bin directory, locate the Miner.InitializeConduitDuctSearch.esriAddin.
Double-click it to open.

- In the Esri ArcGIS Add-In Installation Utility dialog, click Install Add-In.

- Click OK to close the confirmation dialog.
- From the Customize dialog, drag and drop the Initialize
Conduit Duct Search tool onto the ArcFM Solution toolbar.

- Close the Customize dialog.
Initialize the ConduitDuctSearchInfo Table
When you create the ConduitDuctSearchInfo table, it starts empty. Below, you use the Initialize Conduit Duct Search tool to populate it.
-
In the Catalog Tree, click the dataset that includes the ConduitSystem feature class in order to highlight the dataset. The name of your conduit feature class might vary, and the important part is this is the feature class with the ULS class model name. In the following example image, the ElectricDataset is highlighted because it contains the ConduitSystem feature class.

-
On the ArcFM Solution toolbar, click the Initialize Conduit Duct Search
 tool.
tool. -
The tool runs. ArcCatalog is unavailable while running the tool. When finished, it stops without a dialog.
-
In the Catalog Tree, click the ConduitDuctSearchInfo table once to highlight it.
-
Click the Preview tab.
-
Verify the table is now populated with records and duct attributes.
 NOTE: Only use this table to search the records. Any changes to the table will not make changes in the main records.
Assign Autoupdaters to the ConduitSystem Feature Class
Autoupdaters keep the ConduitDuctSearchInfo table in sync with data changes.
The Autoupdaters are assigned to the ConduitSystem feature class. Again, your feature name might differ, and this is the feature class with the ULS class model name.
-
On Feature Create: ArcFM Update Conduit Duct Search Info
-
On Feature Update: ArcFM Update Conduit Duct Search Info
-
On Feature Delete: ArcFM Delete Conduit Duct Search Info
 IMPORTANT: If your tasks already have autoupdaters assigned, use the “Multiple” option in order to assign more than one autoupdater to the same task.
Create a Join between the Conduit System and ConduitDuctSearchInfo Table
Lastly, in ArcMap you create a join between the Conduit System and ConduitDuctSearchInfo Table and save it in your Stored Display.
-
In ArcMap, open the Stored Display typically used for conduit management purposes. If you are trying to assist your end users, ensure you are modifying the System Stored Display.
-
Ensure you are not editing. You are unable to save Stored Displays while editing.
-
Use the Add Data tool to add the ConduitDuctSearchInfo table into your Stored Display
-
In the Table of Contents > List by Drawing Order, find your Conduit System (again, your name might vary).
-
Right-click it, then choose Joins and Relates > Join.

-
For, “Choose the field in this layer that the join will be based on,” choose GlobalID (or, ObjectID if GlobalID is not enabled).
-
For, “Choose the table to join to this layer, or load the table from disk,” choose the ConduitDuctSearchInfo table. The order of this drop-down matches your Table of Contents, and thus, the ConduitDuctSearchInfo table is likely toward the bottom of tables since you just added it recently.
-
For, “Choose the field in the table to base the join on,” choose ConduitGuid (or, ConduitObjectID if GlobalID is not enabled).
-
Choose “Keep all records.”

-
Click OK.
-
Save your Stored Display.
Test the Configuration with the ArcFM Locator Tool
With the configuration done, perform a test search in the ArcFM Locator tool.
-
For the Locator Tool, use the Attribute Query.
-
Search the Conduit System feature class.
-
Mix and match attributes that are stored at the Conduit System level and at the Duct level. In the following image, Encasement Type is stored within the Conduit System, but Duct Material and Duct Size are stored at the Duct level.
 TIP: Total Length is calculated for the searched Conduit Systems by summing the Measured Length attribute values (this is the field assigned the MEASUREDLENGTH field model name).