Customising the Load Profile and Dimming Curve
LED load types can vary dramatically in their behaviour. Models/Types can vary in their dimming range, minimum and maximum conduction, and turn on delay. Traditional dimmers have fixed the dimmer operating limits, which makes it difficult to achieve the optimum performance for all of the different load types that might be encountered.
The C-Bus Digital Dimmers feature highly customisable Load Profiles and configurable Dimming Curves, which can be configured and selected using the SpaceLogic C-Bus Commission software.
Load Profiles
A Load Profile adjusts certain settings within each dimmer channel which tailor the dimming behavior to improve the end to end dimming experience.
The default inbuilt load profiles for TE and LE mode are conservative settings which are chosen to work well with most typical loads, but cannot be modified.
If acceptable results cannot be realized with the inbuilt load profiles, a Custom Load Profile may be defined and applied to a dimmer channel.
Each dimmer supports up to four Custom Load Profiles.
Custom Load Profiles can be named, saved, and shared, allowing commonly used settings to be easily re-used.
The Custom Load Profiles allow the minimum and maximum conduction values to be set, to optimise the dimming range for the load. They also allow the soft turn on and soft turn off times to be adjusted, as well as allowing the configuration of a kickstart, which can aid in startup for problematic load types such as LED strip drivers or fan motors.
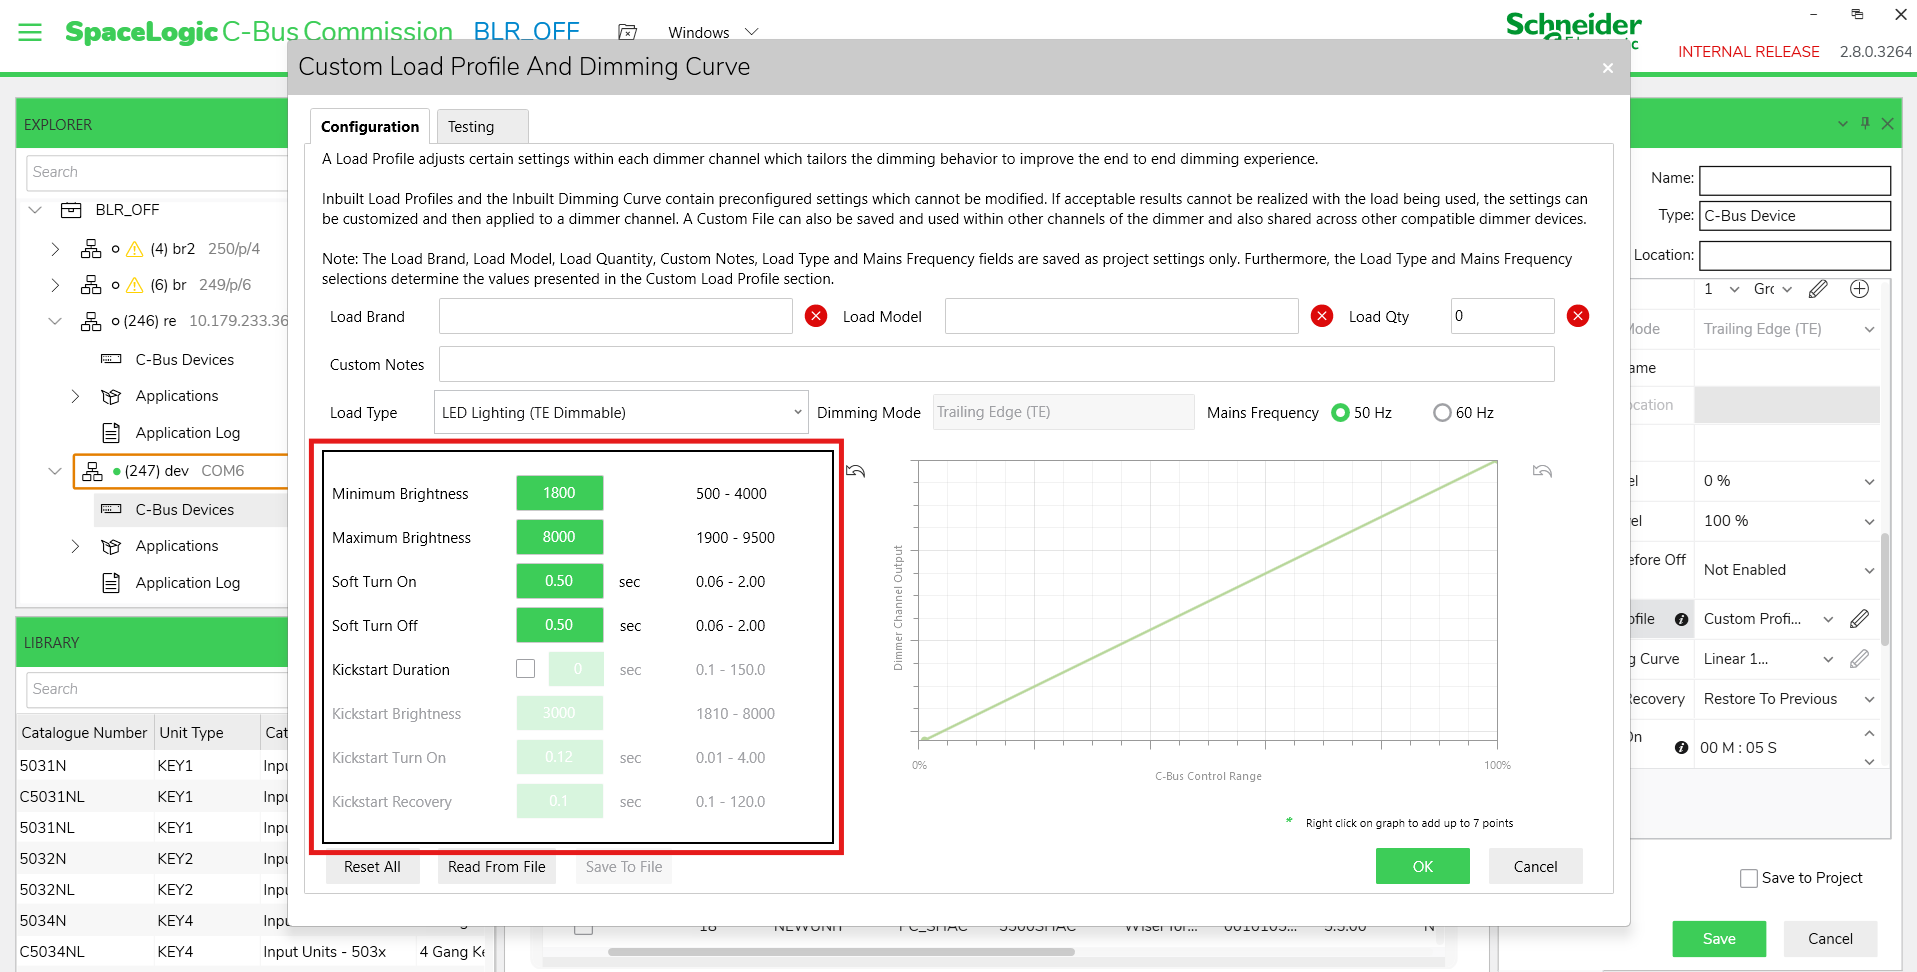
The below image displays the Custom Load Profile from SpaceLogic C-Bus Commission software.
Minimum Brightness
Minimum Brightness sets the lowest conduction time for the channel. This is the brightness level at which the channel turns on at the start of its soft turn on, and the brightness level that will be set when the C-Bus Group controlling the channel is set to minimum. This should be adjusted to the lowest value where the lamp is operating in a stable manner, and turns on reliably and in a reasonable amount of time.
Maximum Brightness
Maximum Brightness sets the highest conduction time for the channel. Many lamps will reach their maximum brightness at a conduction time lower than full conduction. The maximum brightness should be set to the value at which no further visible change in brightness is observed as the conduction time is increased.
Soft Turn-On
Soft Turn On sets the fade rate used by the dimmer when changing between levels with an Instant ramp. The value corresponds to the time taken to fade from minimum to maximum when the channel is toggled from off to on. The range of values that can be set is limited depending on the settings for minimum and maximum brightness.
Soft Turn-Off
Soft Turn Off sets the fade rate used by the dimmer when changing between any on level and off, with an Instant ramp. The value corresponds to the time taken to fade from maximum brightness to off.
Kickstart
Some types of loads have problems starting at low conduction/brightness settings. In the case of an LED lamp, this can show up as the lamp taking a long time to turn on when turned on at a low setting, or taking a long time to respond and then suddenly turning on at a higher level when ramped up slowly from off. In the case of a motor such as a sweep fan, it might take a long time to start moving or not move at all at low settings.
The Kickstart is a feature which, when enabled, uses a higher brightness setting for a short amount of time when transitioning from off to on, which improves the startup behavior of loads with these kinds of problem.
When kickstart is enabled, each time the channel is turned on, if the level is less than the Kickstart Brightness, the channel will fade to the Kickstart Brightness setting over the duration set by the Kickstart Turn on setting. It will then stay at the Kickstart Brightness setting for the duration set by the Kickstart Duration, and then fade to the current level over the duration set by the Kickstart Recovery setting.
Kickstart Duration: Kickstart Duration sets the duration for maintaining the kickstart brightness level before recovering to the C-Bus level.
Kickstart Brightness: Kickstart Brightness sets the dimmer kickstart minimum brightness level before when transition from off to on (at any level).
Kickstart Turn on: Kickstart Turn on sets the time taken for the transition from minimum brightness to the kickstart brightness at the beginning of the kickstart. The range of values that can be set is limited depending on the settings for minimum brightness and kickstart brightness.
Kickstart Recovery: Kickstart Recovery sets the time taken for the transition from the kickstart brightness level to the currently set level of the load at the end of the kickstart duration period.
Dimming Curve
A Dimming Curve refers to a translation between C-Bus input level and dimmer channel output (Conduction Time/Brightness).
For each Custom Load Profile, a custom Dimming Curve may also be defined.
In all dimming curves, an input level of 1 (minimum level on C-Bus) is mapped to minimum brightness and an input level of 255 (maximum level on C-Bus) is mapped to maximum brightness.
With the inbuilt load profiles, a linear dimming curve is used, which means that for example, an input level of 50 % maps to a brightness value 50 % of the way between the minimum brightness and the maximum brightness. This does not always give a good pushbutton dimming experience.
When dimming with a C-Bus pushbutton dimming function, the ramp rate (the change in C-Bus Level vs time) is constant, indicating the change of conduction time is constant during the ramp. However, as the relationship between perceived brightness vs conduction time may not be linear, this may result in a very non-linear change of perceived brightness as you dim.
For example, the brightness may change very fast at the bottom of the dimming range and much more slowly at the top end of the range. In such cases, by defining a custom Dimming Curve which is flatter at the bottom end of the range and steeper at the top, there is better control available at the bottom end where it is needed because as the level ramps up, the change in conduction time is slower at the bottom end, compensating for the faster resulting brightness change, making the resulting rate of change of brightness more constant through the dimming range.
Example: Custom Dimming Curve

The SpaceLogic C-Bus Commission software includes examples which can be used as starting points for development of Custom Load Profiles for the most common load types :
-
LED Lighting (TE Dimmable)
-
LED Lighting (LE Dimmable)
-
Electronic Transformer (TE Dimmable)
-
Electronic Transformer (LE Dimmable)
-
Incandescent Lighting (TE Preferred)
-
Incandescent Lighting (LE)
-
Sweep Fan
-
Exhaust Fan
Testing Custom Load Profile Settings
When connected to a live C-Bus Network, the SpaceLogic C-Bus Commission software also allows changes in the Custom Load Profile settings to be tested in real-time directly from the software, without the need to deploy to a dimmer and switch.
The testing user interface allows the dimmer channel to be turned on and off from the software at different levels, with different settings for minimum and maximum conduction, to rapidly find the best settings for the given load.
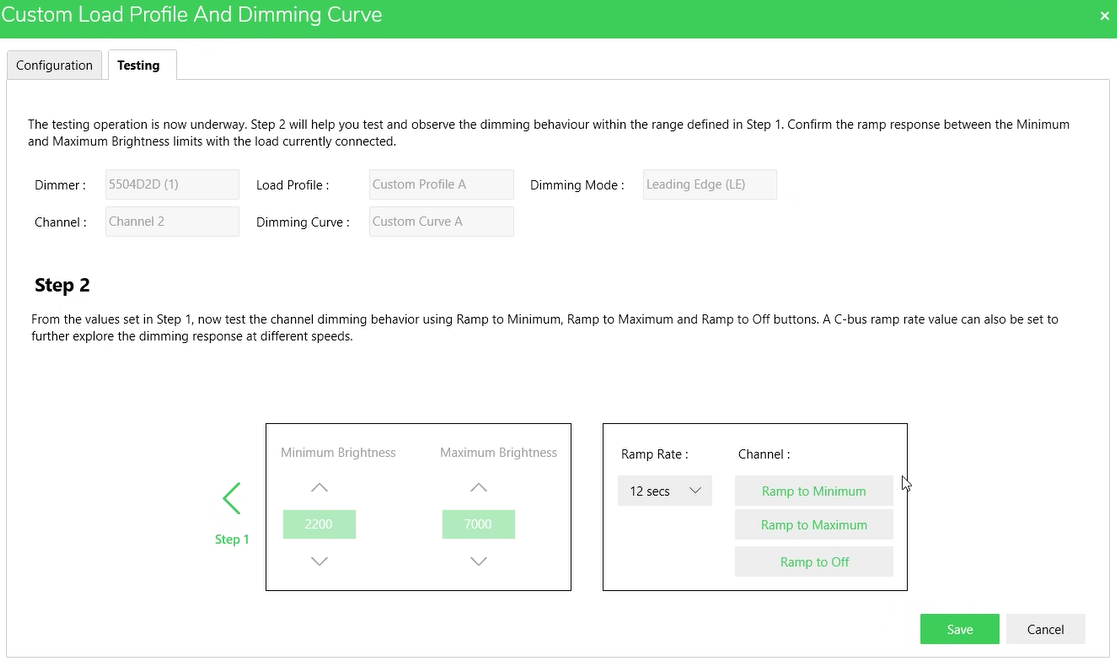
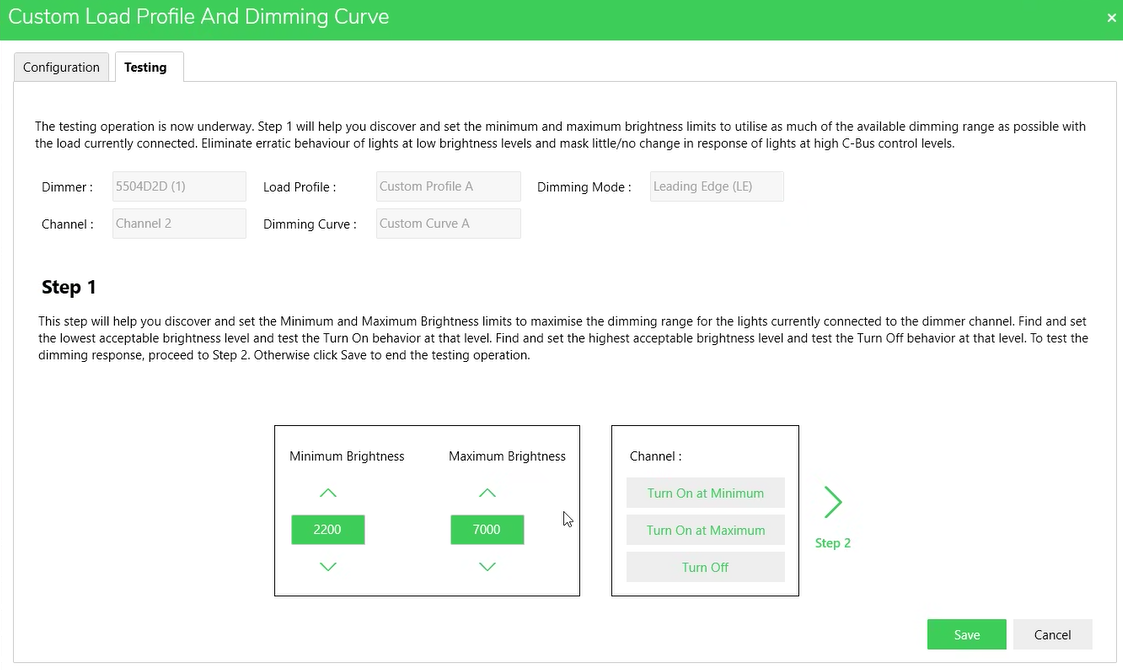
The screenshots below shows the process for testing operation:
Step 1:
Step 2: