
Device NII_Z_1: Check the General Condition of the Device
Safety Instructions
 DANGER DANGER |
|---|
|
HAZARD OF ELECTRIC SHOCK, EXPLOSION, OR ARC FLASH
Failure to follow these instructions will result in death or serious injury.
|
Procedure Definition
|
Procedure characteristics |
Description |
|---|---|
|
Action |
Visually check that there are no visible signs of aging or damage on the different parts of the device. |
|
Goal |
Verify the general condition of the device in operation or following long storage. |
|
Frequency |
Refer to Recommended Frequency for the Routine End-User Maintenance Program. |
|
Special indications |
– |
|
Necessary tools |
– |
|
Preliminary Conditions
The device must comply with the conditions specified below. Refer to the MasterPacT MTZ User Guides to find instructions for operating the device.
|
Device installation type |
Position of poles |
Mechanism |
Device position in the chassis |
|---|---|---|---|
|
Fixed |
Open |
Discharged |
N/A |
|
Drawout |
Open |
Discharged |
Disconnected |
Checking the Front Cover of the Device
|
Step |
Action |
Corrective action |
|---|---|---|
|
1 |
Check presence of all screws on the front cover:
|
If any screws are missing, replace the front cover (refer to MasterPacT MTZ 3P/4P - Front Cover - Instruction Sheet). Refer to the MasterPacT MTZ with MicroLogic X Control Unit - Catalog for spare parts. |
|
2 |
Check that the front cover is not cracked, split open, or deformed. |
If the front cover is damaged, replace it (refer to MasterPacT MTZ 3P/4P - Front Cover - Instruction Sheet). Refer to the MasterPacT MTZ with MicroLogic X Control Unit - Catalog for spare parts. |
|
3 |
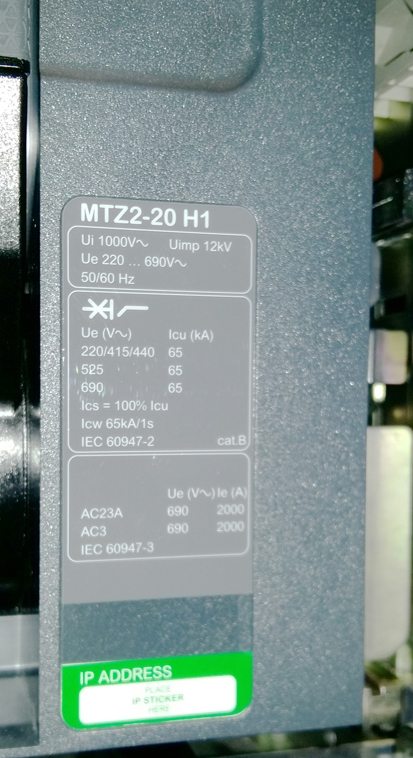
Check that the identification labels are present on the device and the chassis, including:
|
To replace the rating plate, contact your Schneider Electric Services representative. |
|
4 |
If available, check the label indicating the date of the last maintenance operation. |

Checking the MicroLogic X Control Unit
|
Step |
Action |
Corrective action |
|---|---|---|
|
1 |
Check that the transparent cover is in place. |
|
|
2 |
To open the transparent cover, pull its upper right-hand side corner.
NOTE: The
transparent cover must be opened to modify the protection settings
locally or to access the mini USB port on
the front of the MicroLogic X control unit.
At the end of each check when using the mini USB port:
The cover does not need to be opened when modifying the protection settings remotely. |
|
|
3 |
Briefly press (<1 s) the Test/Reset button and check that the four trip cause LEDs and the red Service LED are on.
|
NOTE: If the LEDs light up in sequence, the red Service
LED remains lit until the battery is changed or empty.
If the problem persists, contact your Schneider Electric Services representative. |
|
4 |
Connect the MicroLogic X control unit to a power supply. For example, connect the Mobile Power Pack external battery to the MicroLogic X USB port.
|
|
|
5 |
Check that the Ready LED is flashing, meaning that the fault detection chain is working correctly.
|
If the LED does not flash and no event message is displayed on the control unit, contact your Schneider Electric Services representative to replace the MicroLogic X control unit. |
|
6 |
Press the Bluetooth button and check that the Bluetooth LED is on.
|
If the LED does not light up, replace the MicroLogic X display screen (refer to MicroLogic X - Embedded Display - Instruction Sheet). |
|
7 |
Check the legibility of the data and settings displayed on the MicroLogic X display screen.
NOTE: The
protection functions remain operational when the MicroLogic X display screen is not operating correctly. Settings and data
can be viewed on other interfaces, for example, EcoStruxure Power
Commission software.
|
If the display is not legible, or if the contextual buttons are not operating correctly, replace the MicroLogic X display screen (refer to MicroLogic X - Embedded Display - Instruction Sheet). |


Cleaning the Device
| NOTICE |
|---|
|
HAZARD OF EQUIPMENT DAMAGE
Do not use pressurized cleaning products or products containing
solvents (trichloroethane or trichloroethylene) such as WD40.
Failure to follow these instructions can result in equipment damage.
|
Pressurized cleaning products can cause the following damages:
-
Removal of grease from inaccessible lubrication points. These areas are greased for the life of the device and cannot be regreased.
-
Corrosion of points that are not regreased.
-
Damage caused by the pressure applied by the cleaning product.
-
Temperature rise due to the presence of an insulating solvent in the contact zones.
-
Elimination of special protection.
-
Deterioration of plastic materials.
|
Step |
Action |
Comment |
|---|---|---|
|
1 |
Clean the device using a clean, dry cloth or a brush. |
If there is excessive dust, contact your Schneider Electric Services representative. |
Checking the Case of the Device and Chassis for Drawout Device
|
Step |
Action |
Corrective action |
|---|---|---|
|
1 |
Check for cracks and change in color. |
If there are cracks or change in color, contact your Schneider Electric Services representative. |
|
2 |
Check for traces of black smoke (indicating tripping due to a short-circuit) around the arc chutes and on the sides.
NOTE: For a fixed device, remove
the additional support brackets, if necessary.
|
If there are traces of black smoke, contact your Schneider Electric Services representative. |

Checking Connections
|
Step |
Action |
Corrective action |
|---|---|---|
|
1 |
Visually check the device terminals for a change in color indicating abnormal temperature rise.
|
If there is a change in color on device terminals and you are qualified, follow procedure Power Connections NIII_Z_1. Otherwise, contact your Schneider Electric Services representative. |
|
2 |
Visually check the condition of cable insulation (for example, change in color, cracks, or cable shrinkage). |
If the cables show signs of damage to insulation and you are qualified, follow procedure Power Connections NIII_Z_1. Otherwise, contact your Schneider Electric Services representative. |


Checking Connections in Corrosive Environments
In the case of corrosive environments, contact your Schneider Electric Services representative.
For example, devices may be used in places where sulfur dioxide (SO2) or hydrogen sulphide (H2S) are present, such as, steel works, paper mills, synthetic fibers, refineries, and sulfur chemical plants. Corrosive chemicals can have an impact on the integrity of the device:
-
Excessive temperature rise causes sulfurization (oxidation) of silver and results in destructionof contacts.
-
Contact with SO2 and H2S blackens solid silver and silver-plated contacts which increases contact resistance and temperature.