
Configure Work Locations to Push to the GIS
By default, the Work Locations included in designs are not pushed back to the GIS along with the design components. If that is your company’s desired behavior, there is nothing for you to do.
However, if you want to push the Work Locations to the GIS along with the design, complete the steps in the subsequent sub-topics of this help chapter.
Create Work Location Feature Class
If you would like to push Work Locations from the design to your GIS, then you need a Work Location feature class ready to receive them.
Work Location Feature Class Minimum Requirements
When creating the Work Location feature class, follow these guidelines:
-
It must be a point.
-
The name of the feature class is up to you, but Schneider Electric recommends naming it Work Location.
-
It must be included in the published Network Feature Service. Ensure you re-publish the map service after creating the Work Location feature class.
-
For fields, follow these requirements and recommendations. In terms of the “Recommended” fields, they are all optional. It really depends what you want to track for your Work Locations.
NOTE: As explained in the topic Add Work Location Name to Component Tables (Optional), you can also track Work Location attributes within the design components’ attributes. In other words, in addition to tracking information within the Work Location feature class, every design component could also store its Work Location information within its own attribute table.Required/Recommended
Field Name
Type
Required
GlobalID
Global ID
Required
ObjectID
Object ID
Recommended
DesignID
GUID
Recommended
DesignName
Text
Recommended
Name
Text
Recommended
Number
Integer
Recommended
ShortName
Text
Recommended
WorkRequestID
GUID
Recommended
WorkRequestName
Text
Recommended
WorkRequestStatus
Text
Map the Work Location Fields in the Schema
After creating the Work Location feature class and re-publishing the Network Feature Service, it is now time to inform the Schema of the Work Locations. To do so, follow these steps:
-
In Solution Center > Designer > Catalog, click with the Electric GIS Schema or the Gas GIS Schema.
-
Ensure the Schema drop-down is set to Tables.
-
Click the Add Table
 button.
 -
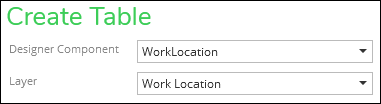
For Designer Component, choose WorkLocation.
-
For Layer, choose Work Location (this is the name of the feature class, so if you named it differently, locate your name appropriately).
-
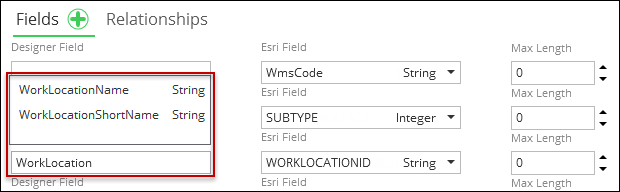
Under Fields, click the Add Field
button. Here is where you decide which fields you want to capture
within the Work Location feature class upon pushing the design to
the GIS. The following image is just an example, and your desired
fields can differ.
-
Check “Push to GIS” for each field.
-
Uncheck “Import” for each field. Importing Work Locations is not currently supported.

-
-
Click Save.
-
Restart the Edge Service to see the changes reflected in the Designer XI application if you are using an on-premises version of the service. The Hosted Edge Service will pick up configuration changes as they occur.
Add Work Location Name to Component Tables (Optional)
In addition to pushing the Work Location itself, you can also choose to store the Work Location Name within the components’ tables. For example, if you push a structure back to the GIS, the structure’s attribute table can include its Work Location Name.
-
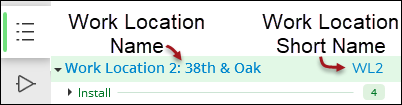
Every Work Location has two names: Work Location Name and Work Location Short Name.
-
You can choose one name to push back to the GIS, but you cannot push both.
To map the Work Location Name or Short Name to the components’ tables, follow these steps:
-
In Solution Center > Designer > Catalog, click Electric GIS Schema or Gas GIS Schema.
-
Ensure the Schema drop-down is set to Tables.
-
Click the component you want to configure.
-
Under Fields, click the Add Field
button. -
Map either the WorkLocationName or WorkLocationShortName to an appropriate GIS field such as WorkLocationID.
-
Check “Push to GIS” for the name field.
-
Uncheck “Import” for the name field. Importing Work Location fields is not currently supported.
-
-
Click Save.
-
Repeat for other desired components.
-
Restart the Edge Service to see the changes reflected in the Designer XI application.