
Custom Work Functions
A Work Function is the core edit being performed against a component. Out of the box, Designer XI provides three Work Functions: “Install” to represent adding a component, “Remove” to represent deleting a component, and “Abandon” for separating a component from the network and leaving it in the field (gas only).
However, your company’s Work Management System (WMS) might be expecting a different term for related functions. Perhaps your company’s WMS tracks “Insert” or “Scrap” or “Retire,” and these functions come with different cost calculations in the WMS. At their heart, they still represent adding, updating, or deleting a component, but the WMS treats them a little differently.
Designer XI allows you to create Custom Work Function names that your WMS recognizes, relate those Work Functions to core edits, and then associate them with CUs.
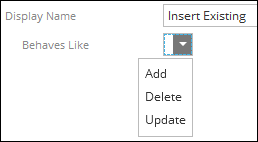
When creating a Custom Work Function, you associate it with a “Behaves Like” function. These functions include the following:
-
Add
-
If the end user changes GIS Attributes with this function, those changes are also sent back to the GIS when the user pushes the design.
-
-
Delete
-
Update
-
If the end user changes GIS Attributes with this function, those changes are also sent back to the GIS when the user pushes the design.
-
Choose Update if you are creating a gas Custom Work Function that is supposed to behave like Abandon.
-
In short, to configure Custom Work Functions, you:
-
Create the Custom Work Function
-
Add the Custom Work Function to CUs and Macro CUs
-
Add the Custom Work Function to the schema
Create the Custom Work Function
-
On the Catalog tab, click the Custom Work Functions subtab.
-
Along the left-hand side, click the New Work Function button.

-
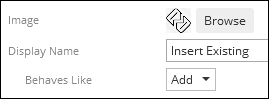
Type a Display Name. These steps use “Insert Existing” as an example.
-
This name is visible to users in the application.
-
This name is added into the schema (steps are below).
-
This name should relate to the Work Function name expected by your company’s WMS.
-
-
Use the Behaves Like drop-down to associate the Custom Work Function with the core edit. In the “Insert Existing” example, “Add” is the most appropriate option.
 NOTE: If creating a gas Custom Work Function that is supposed to behave like Abandon, choose Update from the drop-down.
 -
Optionally, click Browse to add an image to act as the icon in the application for this Custom Work Function.
-
Click Save.
Add the Custom Work Function to CUs
Now that you have created the Custom Work Function, it is time to add it to the relevant CUs and Macro CUs.
The following steps add the Custom Work Function to a CU.
-
On the Catalog tab, click the Compatible Unit subtab.
-
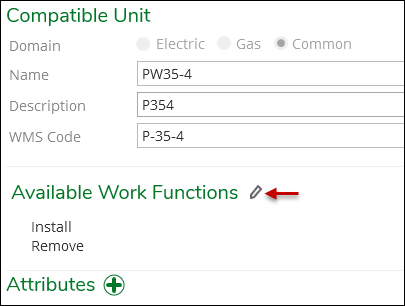
Locate the CU, then click it once to highlight it.
-
By Available Work Functions, click the Edit button.
-
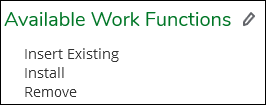
Check the boxes next to the Work Functions you need to associate with this CU, then click Apply.

-
Confirm your selections. These steps continue using the “Insert Existing” example from before.
-
Click Save.
Add the Custom Work Function to the Schema
The final part of configuration is ensuring the schema knows about the Custom Work Functions. This configuration step has two main parts:
-
Ensure the WorkFunction field is mapped for the components that have the Custom Work Function (this step was likely completed during your implementation).
-
Add the new Custom Work Functions to the lifecyclestatus coded value domain.
NOTE: This example assumes Utility Network implementation. For Geometric Network implementations, the coded value domain is WorkFunction.
-
Click the Catalog tab, then click the Electric or Gas GIS Schema subtab.
-
On the schema drop-down in the upper, left-hand corner, click Tables.

-
Along the left-hand side, locate the component type that is getting the Custom Work Function. Click it once to highlight it.
-
Under Fields, ensure the WorkFunction field is mapped. As stated above, this was likely completed during your implementation. However, if it is not present, add this row. See the Schema Editor topic for more information about working with the schema.

-
On the schema drop-down in the upper, left-hand corner, click Coded Value Domains.

-
Many components have a lifecyclestatus domain. Locate the domain specific to the component that is getting the Custom Work Function. Click it once to highlight it.

-
Under Entries, click the Add
 button.
 -
For the Designer Value, enter the name of the Custom Work Function. This example uses “Insert Existing.”
-
If the Designer Domain has not been set and is blank, type in the Custom Work Function name in the Designer Value text box.

-
If the Designer Domain is locked (i.e., not blank) as shown in the image is step 6 , then select the Custom Work Function name from the drop-down list. Locking the Designer Domain field simply implies you are given a stock list of out-of-the-box Work Functions.

-
Also with a locked Designer Domain you can use the Add button to append to the list of Work Functions. Type the name of the Custom Work Function in the Add dialog. The new Work Function is automatically added to the Designer Value text box and to the drop-down list.

-
-
For the Esri Name, choose the appropriate coded value that equates to the Custom Work Function. In this example, it is the same name, but it varies depending on your company’s GIS.

-
Click Save.
-
Continue to add Custom Work Functions to the Coded Value Domains, as needed.
-
When finished, click the Catalog Cache subtab.
-
If you are ready to test the new Custom Work Function, click Update Cache for all rows in your utility. This step is required only if you are planning on opening up the Designer XI application and testing the new Custom Work Function.