
Schedule Updates for Geodatabase Regions
Geodatabase Regions are “snapshots” of the feeder or region as stored in the geodatabase. They should be updated routinely so that the designers working in the Designer XI application have the most accurate information at their fingertips.
-
You can update feeders or regions individually.
-
You can use the Ctrl and Shift keys to multi-select feeders or regions, then update the selected feeders or regions.
-
You can update all feeders or regions at any time by clicking the Update All button.
-
However, given the processing time, the best practice is to schedule routine updates during off hours.
-
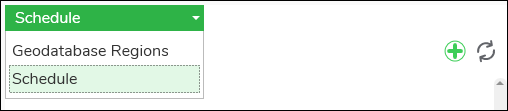
Existing schedules are listed along the left-hand side. Click an existing schedule to view upcoming days/time for the update.
To create a new schedule, follow these steps:
-
Use the drop-down to choose Schedule.
-
Click the Add New
 button.
 -
Type a Title for the schedule. We recommend a concise but descriptive title so that it is understandable at a glance. For example, “Sunday Night at 1am,” or “Every Night at 1am.”
-
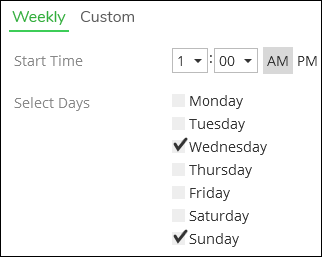
For standard schedules, use the Weekly Scheduler. This allows you to choose days and set the same start time for all chosen days. In the following image, the update starts at 1:00 am on Sunday and Wednesday.
-
Choose the Start Time.
-
Choose the Days.
IMPORTANT: Do you see an option, “Only Update GRRs with Deltas?” This is a handy option, but it is only for electric customers on the Utility Network (UN), which Designer XI does not yet fully support, and those who have implemented GDBM XI. Other applications, such as Feeder Services, already support the electric UN fully, which is why the toggle is present. If you want more information, see the GDBM XI Configuration Guide topic UpdateLastUpdateSubnetworkTimeStamps. -
Click Save.
TIP: You can have multiple schedules to accommodate different start times. For example, you can have an update for Wednesday start at 1:00 am, and have a separate schedule for Sunday to start at 3:00 am. -
-
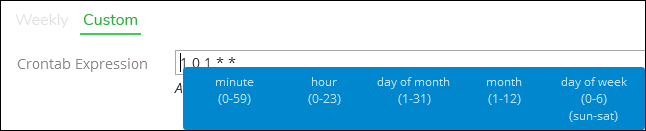
For advanced schedules, use the Custom Scheduler. This allows you to create a crontab expression to accommodate situations like “First of the Month,” or “Every Third Week,” etc.
-
The dialog provides template examples. Click an example to see the equivalent crontab expression.
-
Hover over the expression to see a tool tip that labels the parts of the expression.
-
Search “crontab expression” on the web to see more examples or find an expression builder to assist you.
-
-
After populating the expression, click Save.