
Configure Labels in ArcGIS Pro
In addition to symbols, a Design Style can also include formatted labels. These labels are embedded into the same .stylx file created in ArcGIS Pro.
To include labels in your Design Style, follow the steps below. These steps build a label for the “Name” field, which can be used for all components that have a Facility ID.
-
In an ArcGIS Pro Project, locate your existing .stylx Design Style. If you have been following the previous topics, it is located in the Catalog pane > Styles folder.
-
Right-click the Design style and choose Manage.
-
On the Styles tab, click New Item > Point Symbol or Line Symbol.
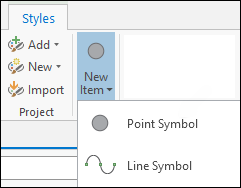 NOTE: Which one should I choose? In terms of label format (size, font, color, etc.) the options are the same between Point Symbol and Line Symbol. The placement choices are different. Line Symbols offer the ability for the label to follow the angle of the line feature itself. Point Symbols offer placement choices such as top, center, bottom, left, right, and fixed angle. The remaining steps use Point Symbol as the example.
 -
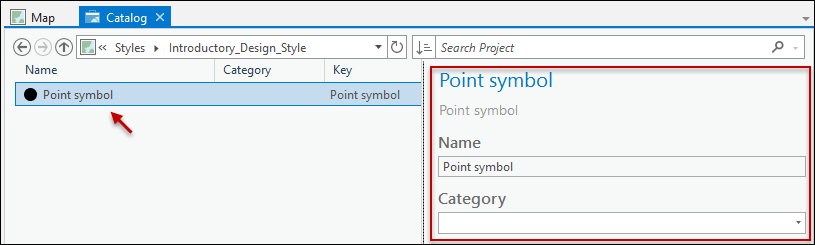
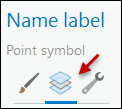
Click the new Point symbol once. This opens its Description.
-
For the properties fields, follow this guidance:
-
For Name, type a short descriptive name. The Name is up to you and your company, so follow your own naming standards.
-
For Category, there are only two recognized values: Style and Labels. In this case, you would type Labels.
For the first label you create, you must type the word “Labels” for the category. For subsequent labels, the word “Labels” appears in the drop-down, and you do not have to type it anymore. You can choose it from the drop-down.
-
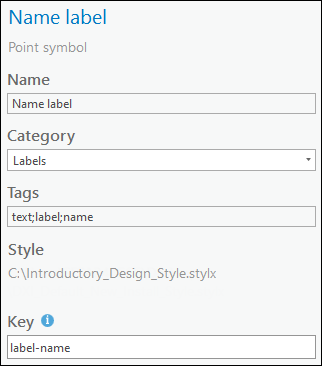
For tags, type logical tags separated by a semicolon. Designer XI does not use the tags in any way, but adding a few tags could be handy for other querying purposes in ArcGIS Pro.
-
For Key, type a succinct, but unique, identifier. The Key can be any unique identifier you want, but read the important notes below to understand more of how it is used.
IMPORTANT:-
Later, this Key is used in the arcade script to know which field you are using within the label. While the Key can be anything you want, we recommend incorporating the Recognized Label Fields for Design Styles as part of the Key. This will make it easier to know which labels go with which types and fields when you are writing the arcade script. For example, if the label is meant to display the component’s Name, then include “name” in the Key, as found in the Recognized Label Fields for Design Styles table.
-
Each Key must be unique within a Design Style.
-
While the Key can have upper and lower case letters, the sample Design Style only allows for lower case letters. Thus, if you are leveraging the sample to create your own style, do not include uppercase letters. If you require upper case letters, you need to change the underlying arcade script to accommodate them. Configuring the arcade script is discussed in subsequent topics in this help chapter.
-
Similarly, while the Key can have spaces, the sample Design Style does not allow for spaces. Thus, if you are leveraging the sample, do not include spaces. If you require spaces, you need to change the underlying arcade script to accommodate spaces.
-
-
-
For the sample “Name” label being created in these steps, the properties would like the following image:
-
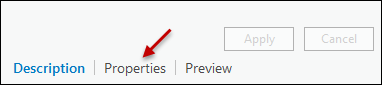
Click Apply.
-
Click Properties.
-
The label needs the know which field contains the text used for the label (see the topic Recognized Label Fields for Design Styles for the full list of possible fields). Further, you might want to add some text before after the label. In short, you need to write the label expression. To do so:
-
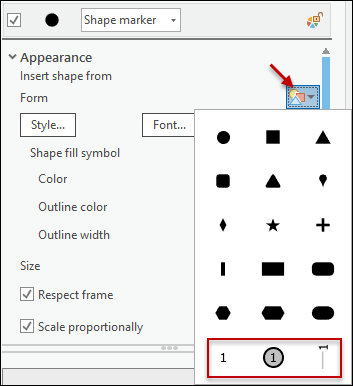
Click the Layers icon.
-
Under Appearance, click the icon presets drop-down, then choose a text preset.
 IMPORTANT: If you are configuring a Line Symbol, you do not see these choices by default. You first need to add a Marker Layer to your label. To do so, follow these steps:
-
Click the Structure
 icon
icon -
Click Add Symbol Layer > Marker Layer.
-
Click the x near the default Line symbol to delete it.
-
Click the Layers icon to return to the Appearance section seen in the image above.
-
Click the icon presets drop-down, then choose a text preset as seen in the image above.
-
-
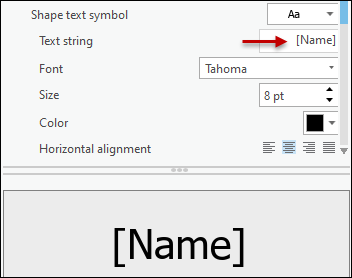
In the Text string field, type the recognized label field within square brackets(see the topic Recognized Label Fields for Design Styles for the full list of possible fields). This example uses [Name].
-
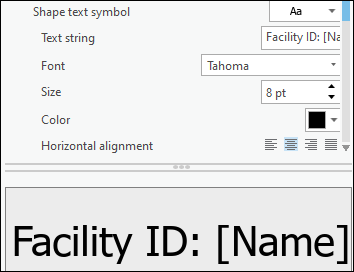
Optionally, add other text before or after the label string.
-
-
Work with the Symbols, Layers, and Appearance options to configure an appropriate label. See the sample for more ideas and examples.
-
Click Apply.