
Create Map Note Graphics and Publish Service
Designer XI supports map notes and graphics. These include points, lines, polygons, dimension lines, and map note text boxes. Further, these can have symbolized subtypes. The subtypes and symbols are configurable at your company. The following image is an example of a line graphic:
And, here is an example of a point graphic:
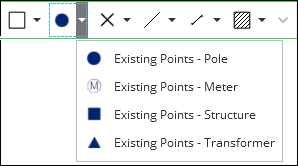
You can have multiple kinds of point graphics, line graphics, and polygon graphics. The toolbar automatically expands to “make room” for additional graphic choices.
You create all these graphics in a map note dataset, with one feature class per type of map note. They are symbolized in ArcMap or ArcGIS Pro, then published as a map service.
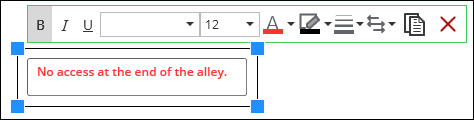
There are two “special” Map Notes that have extra functionality: Map Note text and Dimension Lines. The map note text comes with a rich text editor that allows users to type or paste text into their design map.
The dimension lines include a measured distance running in parallel with the graphic line.
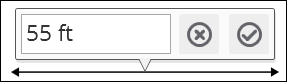
These two types have a few specific configurations discussed below.
|
|
|
|

- Create a feature dataset to contain the map note feature
classes.
- If you are using ArcCatalog, see the instructions provided by ArcGIS Resources for Creating a Feature Dataset.
- If you are using ArcGIS Pro, see the instructions provided by ArcGIS Resources for Create Feature Dataset (Data Management).
- In the dataset, create one feature class per map note type.
As stated in the introduction above, you can create points, lines,
or polygons. The only mandatory types are:
-
Map Note (polygon)
-
For the rich text editor Map Note, this must be a polygon.
-
-
Dimension Line (line)
-
For the dimension line capability of displaying the measured distance, this must be a line. Do not use the Esri type of Dimension.
-
-
- Read through the following points for guidance about fields.
-
All feature classes in the Map Notes dataset require an ID field with a field type of GUID. The Name of the field is up to you (for example, MapNoteID).
-
If you want different symbols within the map note graphic, you need a field to contain their subtypes with a field type of Long Integer. The Name of this field is up to you (for example, Subtype). If you only require one symbol for the map note graphic, you do not need a Subtype field.
-
Dimension Line must contain a field called Measurement with a field type of Text. The field alias can be whatever you choose.
-
Map Note must contain a field called Notes with a field type of text if the dataset is hosted in an Oracle database. The field can be called Notes or Comment if the dataset is hosted in a SQL Server database. With either enterprise database, the field alias can be whatever you choose.
-
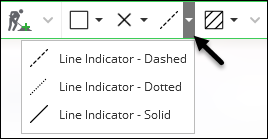
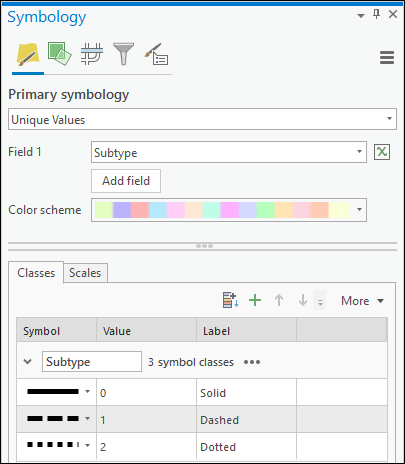
- To have different symbology for different types of map
notes, create subtypes within the feature class. For example, in the
following image there are three types of Line Indicators:
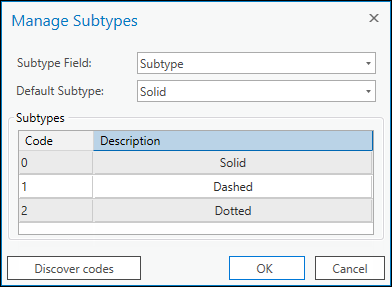
To achieve this, there are three subtypes within the Line Indicator feature class.
If you are using ArcCatalog, you manage subtypes in the Feature Class Properties > Subtypes tab:

If you are using ArcGIS Pro, you manage subtypes from Feature Layer > Data > Subtypes > Create/Manage.
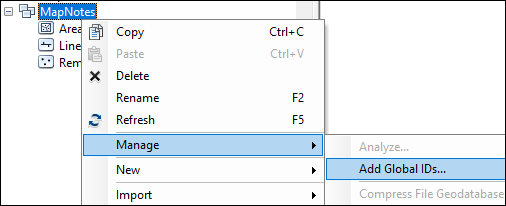
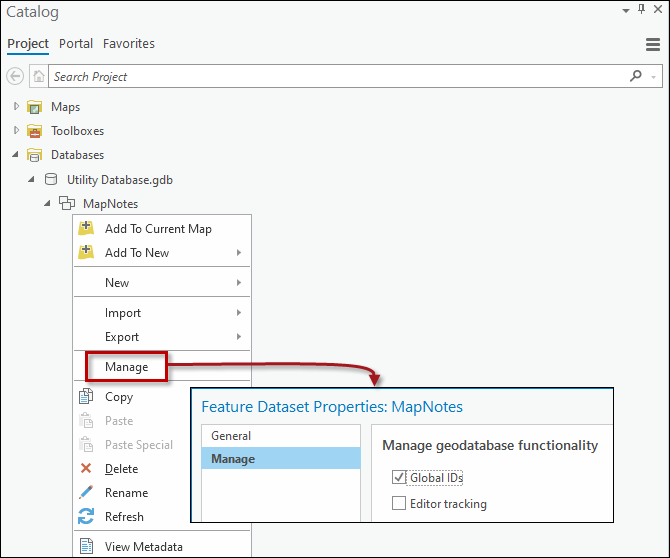
- As stated in Prerequisites, all feature classes used by the application
require Global IDs. This includes the Map Notes. Ensure you add Global
IDs to the dataset:
If you are using ArcCatalog:
If you are using ArcGIS Pro:
- Once the feature classes are created, you can symbolize them.
- If you are using ArcMap to symbolize, follow these sub-steps:
- Open ArcMap.
- Add the map note feature classes to the map document.
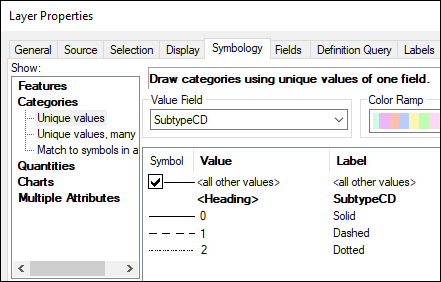
- Define the symbology for each feature class. For example,
if you added subtypes to the feature class, you can choose different
symbols for the subtypes:
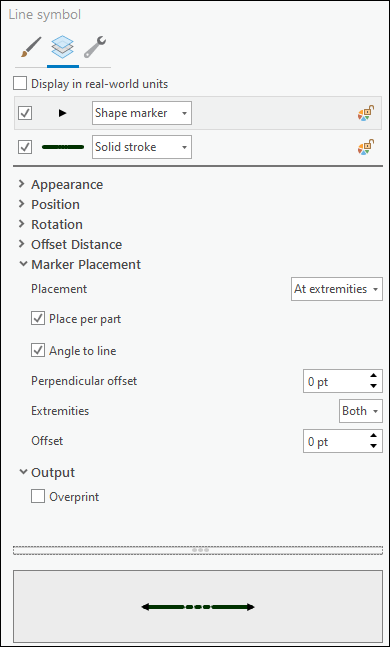
 IMPORTANT: For the Dimension line, be sure to add arrows at the ends.
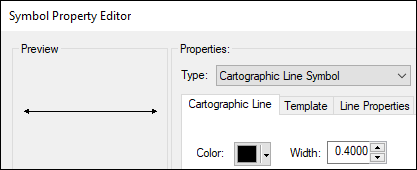
- Set the Display Expression on the Layer Properties >
Display tab.
-
If the feature class is Dimension Line, the Display field must be set to Measurement.
-
If the feature class is Map Note, the Display Field must be set to Notes if your dataset is hosted in an Oracle database. Or, the field must be set to Notes or Comment if your dataset is hosted in a SQL Server database.
-
- For the Dimension Line, configure labels on the Layer
Properties > Labels tab:
-
Check the box next to Label features in this layer.
-
For Label field, choose Measurement.
-
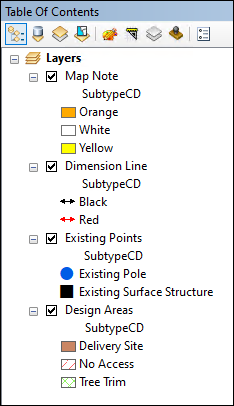
- In the Table of Contents > List by Drawing Order pane,
give the layers user-friendly names. The names will be visible in
the application. The names are up to you, with the following exceptions:
-
The Map Note feature class must be named Map Note. The application looks for this specific name to know how to render it with the rich text editor.
-
The Dimension Line feature class must be named Dimension Line. The application looks for this specific name to know how to render it with the parallel length.
-
- Save the ArcMap document.
- If you are using ArcGIS Pro to symbolize, follow these
sub-steps:
- In Feature Layer > Appearance > Symbology, define the
symbology for each feature class. For example, if you added subtypes
to the feature class, you can choose different symbols for the subtypes:
- For Dimension lines, build a “stack” of
symbols to accommodate the arrows at the end.
- Set the Display Field on the Layer Properties > Display
tab.
-
If the feature class is Dimension Line, the Display field must be set to Measurement.
-
If the feature class is Map Note, the Display Field must be set to Notes if your dataset is hosted in an Oracle database. Or, the field must be set to Notes or Comment if your dataset is hosted in a SQL Server database.
-
- For the Dimension Line, configure labels within Feature
Layer > Labeling > Label Class:
-
Check the box next to Label Features in This Class.
-
For Field, choose Measurement.
-
- In Contents > List by Drawing Order pane, give the layers
user-friendly names. The names will be visible in the application.
The names are up to you, with the following exceptions:
-
The Map Note feature class must be named Map Note. The application looks for this specific name to know how to render it with the rich text editor.
-
The Dimension Line feature class must be named Dimension Line. The application looks for this specific name to know how to render it with the parallel length.

-
- Save the ArcGIS Pro project.
- In Feature Layer > Appearance > Symbology, define the
symbology for each feature class. For example, if you added subtypes
to the feature class, you can choose different symbols for the subtypes:
- With the feature classes symbolized, they are ready to
publish. IMPORTANT: If your feature service is operating over HTTPS, you might need to install your organization's certificate on the machine where you want to publish your feature service.
- If you are using ArcMap, see the instructions provided
by ArcGIS Resources for Publishing a Map Service.
-
For Capabilities, check the box for Feature Access.
-
Once checked, click Feature Access when it appears on the left side of the dialog.
-
Under Operations allowed, check all except Sync and Extract.
-
- If you are using ArcGIS Pro, see the instructions provided by ArcGIS Resources for Share a Web Feature Layer.
- If you are using ArcMap, see the instructions provided
by ArcGIS Resources for Publishing a Map Service.
- After successfully publishing the service, point to its URL using Solution Center > Designer XI Plugin. For more information, see the Mapping Tab topic.