
Add Palette and Groups
Palettes act as containers to categorize your company’s Templates. You can organize Palettes in any way that suits your business needs. Some companies organize by installation type, by component type, by job type, etc.
The naming conventions you use are visible to all users, so ensure they make sense company-wide.
-
You create both Palettes and Templates within the Designer XI application itself.
-
You need the Designer.Administrator role in order to create Palettes and Templates.
To create a Palette, follow these steps:
-
In the Designer XI application, click the Palettes pane.
-
Toward the top of the Palettes pane, click Configure.
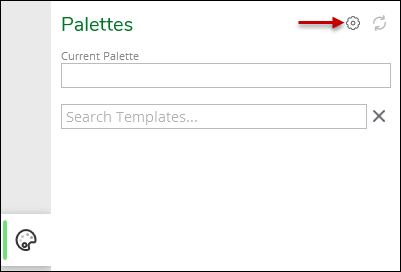 NOTE: Do you not see the Configure icon? You need the Designer.Administrator role in order to create Palettes and Templates.
 -
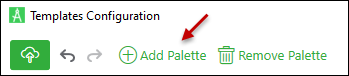
Notice a Templates Configuration dialog opens. You can move this dialog, even to another monitor to free up space in the application.
-
Click Add Palette.
-
Type a name for the Palette (these steps use “Residential Equipment” as an example), then click Apply (i.e., disk icon).
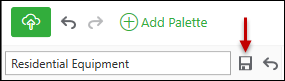 NOTE: The Palettes pane sorts the Palettes by their name alphanumerically. Keep this in mind while naming your Palettes.
 -
Notice after clicking Apply, you have two new tools available: Rename and Toggle Visibility.

-
Rename: Allows you to change the name of the Palette.
-
Toggle Visibility: This hides or reveals the Palette to end users, assuming the Palette has been Saved to the Cloud.
-
As you apply changes to your Palette, those changes are saved locally. Once you click the Save to Cloud
 button, those changes are saved to the Catalog hosted service. It
is at that point the Palette is visible for all other users. If you
are not ready to share your Palette, you can toggle its visibility
off. You still get to Save to Cloud (which is recommended in order
to back up your work), but do not yet have to make the Palette visible.
button, those changes are saved to the Catalog hosted service. It
is at that point the Palette is visible for all other users. If you
are not ready to share your Palette, you can toggle its visibility
off. You still get to Save to Cloud (which is recommended in order
to back up your work), but do not yet have to make the Palette visible. -
As you are working on a Palette, we recommend you toggle visibility off so that your draft work is hidden from end users. Once you have completed the Palette, toggle visibility back on and Save to Cloud to share your Palette with end users.
-
-
-
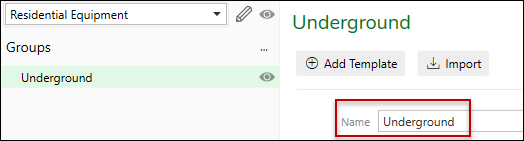
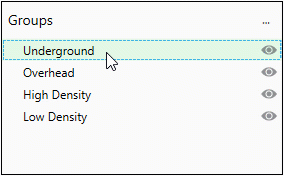
To the right of Groups, click the ellipsis, then click Add Group. Groups let you further organize Templates within a Palette. They are akin to sub-folders.

-
For the Group, type a Name, then press Enter. Notice the Name updates throughout the dialog.
-
Notice the Group itself has a Toggle Visibility icon. This lets you hide a Group from end users while you are working on it (much like you can hide an entire Palette from end users as described above).
-
Click the Save to Cloud
button, which pushes your changes up to the Catalog hosted service.
You can click Save to Cloud as often as you require, and we recommend
doing so periodically to back up your work.
At this point, you have a Palette and Group ready to contain Templates. Creating a Template is covered in the next help topic. Before moving onto the next topic, there are a few more tools and functions that pertain to Palettes:
-
You can have multiple Groups within a Palette. Each time you want a new Group, click the ellipsis, then click Add Group.
-
When you have multiple Groups, you can order them with a drag and drop. So, while Palettes are sorted alphanumerically by the application, you can sort Groups any way you want
-
Within the Templates Configuration dialog you have Undo and Redo capabilities.
-
To delete a Group, click it once to highlight in green, then click the Delete
 icon on the bottom of the dialog. There
is no confirmation dialog when deleting a Group, but you can click
Undo if you want to bring the Group back.
icon on the bottom of the dialog. There
is no confirmation dialog when deleting a Group, but you can click
Undo if you want to bring the Group back. -
The Remove Palette tool deletes the Palette for all users. You receive a confirmation dialog confirming you want to delete the Palette. If you have not yet clicked Save to Cloud, you can Undo the Remove Palette action and bring it back.
-
Once you click the Save to Cloud
button, your Undo and Redo “stacks” are cleared, and
the tools are no longer available until you perform another action
or edit.