
Edit Tags for CUs
Designer XI is integrated with your company’s Work Management System (WMS). Tags provide an additional (and optional) method to communicate information to your WMS. For example, a CU might be in a particular zone or designated area that affects cost calculations at that location. Tags are sent to the WMS along with the CUs so that it understands how to calculate them appropriately.
To add and edit tags for CUs, follow these steps:
-
In the Project pane, find the CU where you want to add or edit tags.
-
Hover over the options
 icon for that CU, then click the Edit Tags
  tool.
tool.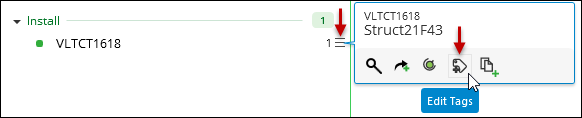
-
On the left-hand side of the dialog, click the Tag Category.
-
On the right-hand side, add the appropriate tags. Tags vary by company, and your tags differ from the images below.
-
If the Tag Category is “constrained,” that means the tag values are provided for you. Click the tag you require.

-
If the Tag Category is “unconstrained,” that means pre-determined tags are not provided, and you should type the value you require.

TIP:-
If the list of constrained tags is long, you can type a filter to shorten the list.

-
Some categories allow multiple tags, and some do not. For example, a certain CU might involve two different labor types. However, for a structure CU there is likely only one soil type. The ability to add multiple tags within the same category is set at a company-wide level. Talk to you administrator if you need to be able to add multiple tags within the same category. Adding multiple tags from different categories is always allowed.
-
-
If necessary, click other Tag Categories and add more tags.
-
Click Apply.
TIP: Do you not see the Apply or Cancel buttons? When you clicked the Edit Tags tool, your Designer XI application screen size was likely quite small on
the monitor. Now, it is cutting off those buttons. Click Esc to close
the dialog, maximize the Designer XI application, and try again.
In the Project pane, directly beneath the CU, tags are visible as color-coded dots. Hover over the dot to view a tool tip for that tag.

Tags are also visible when you hover over the CU’s options icon.

Remove a Tag
To remove an existing tag, follow these steps:
-
Return to the Edit Tags dialog. To do so, hover over the options
icon for the item with the existing tag, then click the Edit
Tags tool. -
On the left-hand side of the dialog, click the Tag Category that contains the existing tag. Tags that are assigned in that category are listed directly beneath the Tag Category name.
-
On the right-hand side, tags that are already assigned are filled in with color. Tags vary by company, and your tags differ from the image below.

-
Click the currently assigned tag to remove it. It loses its fill color, and it is no longer listed under the Tag Category.

-
Click Apply.