Add a Remove CU
On the Project pane, you can add an remove CU:
-
To an existing remove Driving CU
-
To an existing remove Macro CU
-
To a Work Location
-
To the No WL (no Work Location) area at the top of the Project pane
You can add remove CUs to other remove CUs. You cannot add remove CUs directly to install CUs. Removes and installs can be part of the same design, for example, in a replace situation. However, they appear separately on the Project pane.
Regardless of where you add the remove CU, the process is the same. To add a remove CU from the Project pane, follow these steps.
-
In the Project pane, find the line item where you want to add the remove CU.
-
Hover over the options
 icon for that item, then click the Add a Remove CU
  tool.
tool.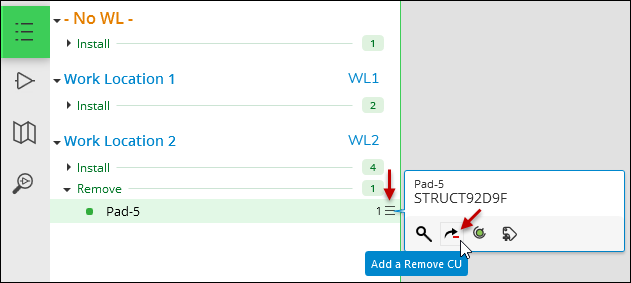
-
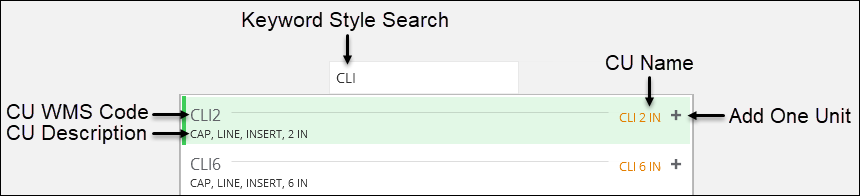
The CU Search dialog appears. Type what you know to find the appropriate CU. The search field automatically queries the CU WMS Code, Description, and Name.
-
To add the remove CU, either double-click the CU or click the Add One Unit
 tool.TIP: If you are only adding one remove CU, double-click is the way to go. It adds the remove CU and closes the dialog. However, if you are adding more than one remove CU (and even more than one kind of remove CU), then the Add One Unit tool is the way to go. This adds the CU, but leaves the CU
Search dialog open, so you can continue to search and add CUs. If
using the Add One Unit tool, click Esc when finished to close the CU Search dialog.
tool.TIP: If you are only adding one remove CU, double-click is the way to go. It adds the remove CU and closes the dialog. However, if you are adding more than one remove CU (and even more than one kind of remove CU), then the Add One Unit tool is the way to go. This adds the CU, but leaves the CU
Search dialog open, so you can continue to search and add CUs. If
using the Add One Unit tool, click Esc when finished to close the CU Search dialog. -
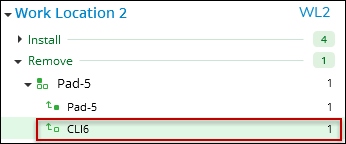
In the Project Pane, verify you see the remove CU.