
Remove Multiple Components
- On the Design tab, click the Remove Existing Components
 tool.
tool. - Hover the tool over a component you want to remove.

- Press and hold the left mouse button, and move over all
the components you want to remove. As you do so, a green highlight
of what will be removed is left behind.

- When you’ve painted all the components, release
the mouse button.
After releasing the mouse button, there are three possible outcomes:
-
Designer XI successfully locates and assigns the appropriate removal CU.
-
The component on the map takes on the removal color of green.
-
The removal CU is listed in the Project pane.

-
-
Designer XI locates a probable removal CU, but seeks your input to confirm it found the appropriate one.
-
A green badge
 appears on the map alerting you to the
probable match.
appears on the map alerting you to the
probable match. -
Hover over the green badge, review the recommendation, and press A to accept.
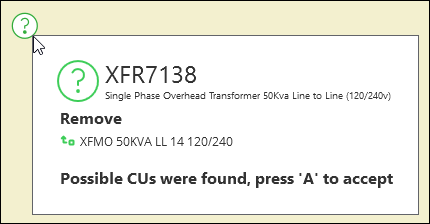
-
Or, in the Project pane, click the Change CU
 tool to search for a more appropriate removal CU.
-
-
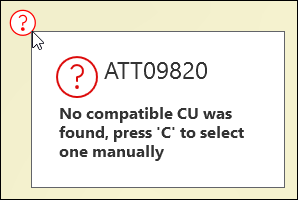
Designer XI does not have enough information to automatically assign the removal CU and requests you search in the catalog for it.
-
A red badge
 appears on the map alerting you that no
match was found.
appears on the map alerting you that no
match was found. -
Hover over the red badge and press C to search for the CU manually.
 TIP: If there are multiple red badges in the same location, they stack on top of each other. After you clear a badge, hover over the stack again to address the next issue.
-
-
- Using the Project and Component Information panes, review
and confirm the removals.TIP: To un-remove something that should not have been removed, select it on the map or the Project pane and press Delete. This removes the removal CU and leaves the existing component as it was.